Wednesday, July 18, 2007

Image : Forced Grin

Title : Forced Grin
Date : July 27th, 2007
Media : Photoshop 7 & Wacom Tablet : Tie pen pressure to both brush size AND opacity for best results

Image:


Thoughts :
Done in 1.5 hours, from complete scratch, entirely on the computer? That's pretty amazing, for me at least. I'm normally wretched with CG sketching. It helped that I had such a fixed image of my head of a stitched on grin... I love the hands, the lace, and the teeth. Nothing but the tears look poor to me. How *does* one illustrate tears? I also don't think I quite captured the extreme distress of the grinner. What an odd feeling it is, as an artist, to try and capture an extreme negative emotion. Do we project an attempt at the mood upon ourselves? Are we inflicting it upon our subject? How can you capture the mood without feeling it in some way.
...Perhaps if I understood biology or psychology better I could explain this fact, but regardless I know it to be true- a mood is brightened by smiling. Your own false or force smile, a received smile, an offered smile. Any and all elevate the mind and the mood. Some may question the inclusion of a false smile but please do not miss-interpret it. I do not mean a sneering upturned corner of the mouth or a sulking twist of the lips offered up to some relative. Instead, replace your default blank expression with a slight curve of the mouth. At the very least, un-furrow that brow. Such strain often offers low level distress and you'll find you cannot keep it so tense and easily grin. ...

Sunday, July 15, 2007

Project : Wooden Bug

Project : Wooden Bug
Date : End of June 2007
Materials : Wood, pins, flux, solder
Tools : Soldering iron, pliers, hammer
Finished Product:

Process:
Find yourself a piece of drift wood that has a lot of character. Add to this character by burning into it patterns and designs with your soldering iron. Hammer a couple of pins into the body, bend them, then solder another set of pins onto the ends of them for segmented legs. A drop of solder on the first bent pin's turn adds to the look of large segmented bug legs. The end.

Thoughts :
It's a good idea, but I just don't know how to burn wood interestingly. The sucker patterns- neither patch of which are pictured here- were the most successful look. I will definitely try more of this, it is a pleasant mixture of nature and metal.

Friday, July 13, 2007

Project : Damaged Messenger

Project : Damaged Messenger
Date : July 12th, 2007
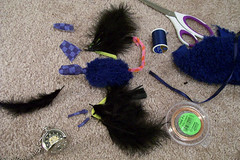
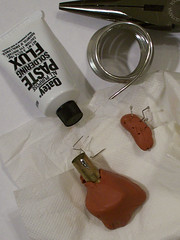
Materials : Type writer parts [most notably the N/n striking bit, levers, and springs], copper tape, copper wire, pins, nails, a screw, drift wood, flux, far too much solder
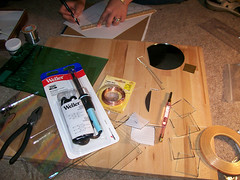
Tools : Pair of pliers, soldering iron, saw, hammer
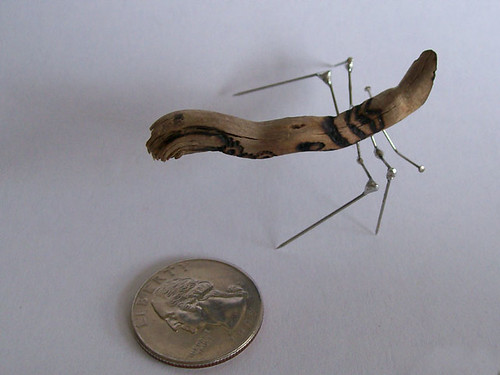
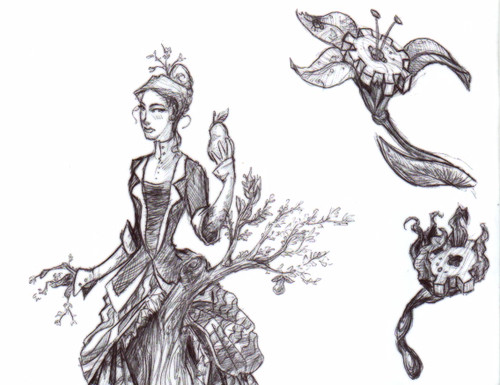
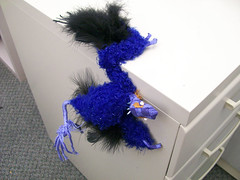
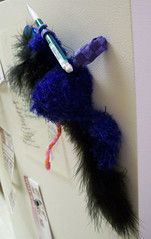
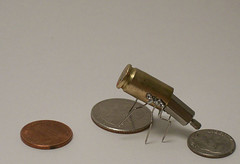
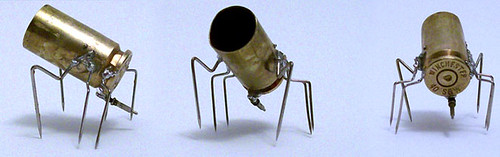
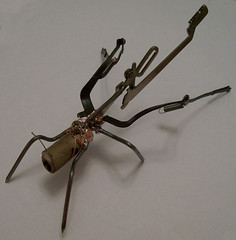
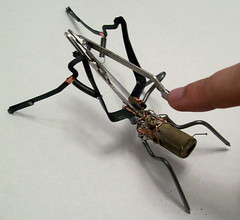
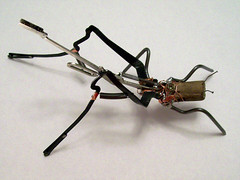
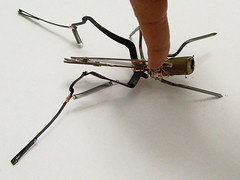
Finished Product:


Process:

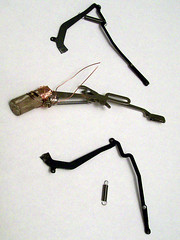
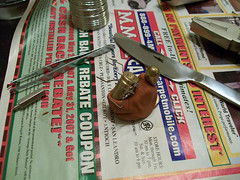
Yank out all the parts from the machine. I found gripping at the base with the needle-nose pliers and then just agitating it with constant little wiggles eventually broke the metal. Attach the striker to the.... 'tail spring' part. Cut a notch in drift wood and then cut to 'body' length. Line notch and base of wood with copper tape and spend far too long trying to both wedge the tail into place and solder it to the tape. Oh, and be sure not to let the tape fall off the wood. Score the wood with a soldering iron and wrap the base with wire- preferably catching it in the groves you just burnt. If you make a mess like I do, consider hiding it behind a screw which can also work in as a sort of anchor for the wires.

Now consider the hind legs. Wrap a thin strip of copper tape where you want one half of the spring to connect, then solder it down. Try, somehow, to bend them into a fitting position. Wrap the leg's connection point in copper tape and liberally apply solder to the entire thing. Struggle for at least 30 minutes to attach the legs straight to the tail, give up and wrap the wire around them for support. Now you'll find it's super easy to solder them down. Oh, if you really want to do it the Sithel way, be sure to damage your soldering tip somewhere at this stage. Now bend some nails and solder them to the copper tape, this can also help prevent wire wiggling and further anchor down the tail.

If you're not lazy, you might consider permanently attaching the other half of the springs, but I didn't bother. Add flare for personality such as pins for antennae and a stupid burnt gash for a mouth.

Thoughts :
So I found an old, semi-electric typewriter at an recycle store and nabbed it for a reasonable price. The keys are far from pretty, but I found myself drawn to the myriad number of springs and levers in the back, as well as the strikers which are so unique to the machine.

I list this as being quick- about 3 hours total- but I had spent nearly an entire evening previous pulling the machine apart and getting familiar with the pieces. It helped that I sad down the evening of construction with a relatively clear image in my head of what I wanted and how I'd get it from the start.

My original intent was a sort of scorpion feel, it turned out more grasshopper-esque, and photographs like a spider! The pivot for the "tail" is a unique and very fine piece I pulled from... somewhere. It was a fight to overcome the "I must save this till the *perfect* project comes up" feeling in order to actually *make* something. The key is of corse unique, but I'm not overly fond of the letter. The legs came jointed- they connect to the strikers so I've got quite a few left. The springs from below the keys- no shortage of supply there- and are of a very pleasing tension. At the same store I grabbed the typewriter, I scooped a bag of random bits for $0.50. During construction, I was quite sad to find that my first choice of black screws for the legs from wouldn't take solder and then that I only had 3 nails. My firm intent to finish the piece before the night was over drove me to using the nails and suffering the absence of a leg. Given how, upon finishing it, the story for the piece *leapt* out at me, I'm happy with my choice.

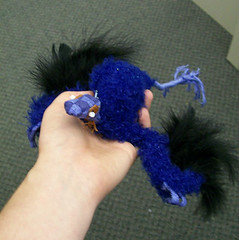
The screw was just added to cover my mess and the pins a last minute attempt to add pins to the project since I love them so. After I used the spring for the tail, I was determined to incorporate more spring joints into the piece. Playing with the tail is fun and pushing that extra bit to "squish" it- where its leg gives out and it drops to its tummy- is a quaint feature.
Like all things made by her, the creatures served a practical purpose that was obscured by a layer of secrecy and infused with a feeling of spite. The little assembly of messengers might appear impractical at first glance- larger then any folded slip of paper and prone to being noticed due to scuttling sounds as they traveled. A flock passing down a dark corridor would make the hair of any listener stand on end, so eerie was their faint metallic clicking of furiously moving limbs. But unlike a slip of paper or a errand boy prone to cracking under torture, the little constructs would never give up their message to any but the designed recipient. And while a slip of paper can be burnt before opening or a mortal messenger evaded, these devices would not rest till their intended knew exactly what the Master Architect wanted them to, no matter how unwelcome the words may be.

The contents which were spelt out via miniscule metallic twitches and the striking typebars were of course encrypted along with fall-backs in the event that not all arrived. The reactions of the message recipients varied. Some found the creatures to be delightfully quaint and amusing. Others shuddered with revulsion as they pressed the constructs' quivering typebar tales to encode their response. Miss Wells abhorred the little constructs- no doubt viewing them as perversions distantly related to her beloved press- and took every opportunity to vent her irritations and frustrations of them and their creator upon their delicate forms. If the messenger was not required for her response she would catch and destroy it, a task becoming increasingly difficult as they seemed to have learned to fear her. Any returning to Master Fletcher were sure to be damaged up to, but just shy of, being incapable of functioning: legs torn off, antenna battered, springs bent. One wondered why the Architect spent the effort on such a clearly doomed creation and if perhaps she would stop should Comrade Wells be less obvious in displaying the irritation they caused her.

Wednesday, July 11, 2007

Review : Book : The Scar

Book : The Scar, by China MiƩville
Data : Finished some time around the end of May 2007
Genre: Steampunk

Brief, spoiler free review : I believe the most vital bit of wisdom I leave this book with is: "Be careful what I wish for." See, I came by this book through a friend with whom I pleaded and begged a reading recommendation from. When asked for what I wanted, I firmly replied with these two facts: "An interesting villain" and "cruelty toward the characters." The first I found makes every good book great and every pithy book bearable. The second is something I don't run across often and am interested in. The lack of cruelty is no doubt simply a symptom of my predominantly fantasy based reading diet- dragons, magic, perhaps the occasional strong female lead, and always a happy ending. Mind you, this particular search had already been narrowed down to the genre of "steampunk". Not only does this book nail my request, it repeatedly beats me over the head with them, nearly leaving me to whimper and regret I asked for them in the first place. Nearly. I came away from the book immensely pleased with the blend of fantasy and clockwork tech, still reeling from the actions within it, and with a ravenous need for more by that author. If you can stomach the nauseous blend of depressing, vicious actions and puffed up pretentious language, I highly recommend it.

Review:


Inspired Sketches:


Tanner

Sunday, July 8, 2007

Project : Glass Box

Project : Glass Box
Date : Some time in June 2007?
Materials : Glass, solder, flux, copper tape, wire, [mirror for Trisha's]
Tools : glass cutter, plier, soldering iron
Finished Product:


On the left is my box, on the right is Trisha's.

Process:
Who knew cutting glass was so easy? The blade fairly flies across the surface with ease and speeds that in truth make it a tad bit difficult to control. Anyway, you slice up the glass, wrap copper tape around the edges, and liberally apply flux to the tape so that the solder will take. If you're smart, like Trisha, you lay solder down on the edges individually. Then try to hold the pieces together and re-heat the solder to attach them- or in my case, struggle to hold two pieces of glass, an iron, and apply solder at the same time. My addition of wire was easy- bend it about, tape it down, and seal with some solder. Afterwards, you wash everything off and declare it done.


Thoughts :
Mine turned out lumpy, unevenly cut, and unattractively thick with solder. Also, the "door" doesn't stand up. But, considering it was my first attempt at anything involving glass, and my first artistic use of a soldering iron, I absolutely love it. The speed of the project counters many negative qualities since it does not hold much "lost time". As fabulous as I found it, I don't think I'll get much into glass. I lack any talent with geometric shapes and have little interest in developing one. I can appreciate and marvel at Trisha's works yet feel little compulsion to try a rival work- an interesting and pleasant sensation for me.
"You didn't actually expect it to stand up, did you? I mean... two hinges are common in all doors for a reason."
"I know, I know... It's just..."
"Maybe if you made the coil longer."
"I know..."
"Or tighter, less wiggle room."
"I know."
"But really, two-"
"I know damnit."

Friday, July 6, 2007

Image : Lilly Tree

Title : Lilly Tree
Date : Some meeting, mid-winter 2006-2007
Media : All pen, no pencil. Minor post-scan touchup
Image:
LillyTree


Thoughts :
For a sketch with no pencil guidance, it most soundly rocks. In no way does it relate to actual Gaslight story lines, real or imagined.
In the back of her mind, perhaps she knew what sort of fate she sealed for herself when she bit into the pear. But in all likely hood, she stood staring at that wretched fruit too consumed with hatred for the faeries to be much shocked.

The tingling in her scalp would have sent any normal London miss into hysterical fits of screaming. The twisting vines about her boots and ankles ruffled her sense of modesty, but what did modesty much mean when the slowly lifted hem of her skirts, pushed up by ever thickening vines, revealed not the pretty curve of calf but rather a solid wooden trunk. It was her hand, in truth, that gave her fright. That appendage which channeled so much of her power- through deftly handled wrench and lighting quick pen strokes. Her last breath was drawn into her lungs as a horrified gasp. The sensation of vines sprouting, crawling across her scalp was the last she felt- the becoming of wood overtaking her fully after that.

And so she stood, a wooden woman made half of sprouting tree, still clothed in her fine, fashionable London dress and holding that fruit which cursed her. Though it soon rotted, she remained- each bud flowering to reveal fruit with a mechanical pit and, in time, no fruit at all but rather a unique wooden gear.

Wednesday, July 4, 2007

Project : Gear Flower

Project : Gear Flower
Date : Some time in February 2007
Materials : Acid [type?], sharpie marker, sand paper, brass square, rubbing alcohol, baking soda
Tools : plastic tub, chop sticks, rubber gloves
Finished Product:

Currently a paper clip is taped to the back of it so it may hang in my cube.

Process:
You take a chunk of etch-able metal (brass and copper were the only options I was made aware of) and you sand it clean. Perhaps a dash of rubbing alcohol, the point is to make it smooth and clean so that there are no rogue spots when you etch. Now you mark up that bit o' metal with a "resist"- in my case a very fine brand name Sharpie marker did the trick. What you cover will not be etched, obviously. The trick I found was wrapping my mind around "lines" which would be neither etched or un-etched, but rather level changes. You see this in the chain links and definition of the gear. Leaving gaps or drawing thin lines were the best methods of definition, rather then settling only on broad silhouetted. Be careful with pencils, I found they left faint marks, working as very weak half-assed resists.


Now you've drawn on it, drop it in a tub of acid. The acid should be in a plastic or glass tub and safety measures such as rubber gloves and glasses wouldn't hurt. Keep some baking powder (baking soda?) on hand to neutralize the acid. Let it sit for a while, jostling it occasionally (we used chopsticks). Be mindful that a buildup will probably form if you let it sit absolutely still, leading to a sort of odd tightly drawn saranwrap look at the edges of resist. Time of sitting may varry, I believe we were using 15-30 minutes. Remove and coat liberally with baking powder to neutralize acid. Scrub, powder, water, scrub, you get the idea.

From this point, personal preference kicks in. I found I liked the look of cleaning it via rubbing alcohol, re-coating the ENTIRE thing with Sharpie, then sanding lightly the surface. This highlights the edges and lets the un-etched segments pop out more. If you don't like the look, you can always re-clean via rubbing alcohol.


Thoughts : Given my short-notice need to come up with an etch-able idea, I found the gear flower adaption worked very well. The font and my grammar are lacking, but when are they not? The gear surface is by far the best aspect of the piece, while the riveted leaf failed to come out clearly. I found the screw heads in the corners added that much needed final touch. If only one corner wasn't bent...

The subject of the gear-flower is only tangentially related to my (fictionalized) Gaslight universe:

The earliest strains were firs breed by Master Lilly Fletcher in the year 1871. There has been much speculation in the community and across the guilds as to how she first coaxed that metallic gear from the flower bud- rusty fertilizer, the grafting of a pocket watch, and brute force magic all candidates depending on who you ask. Though she was known to keep company with several prestigious Physic & Sorcererous guild members, Master Fletcher never offered co-authorship credit to anyone for her work and none tried to take it.

The first varieties which produced wooden gears are not recognized as being especially note worthy- displaying nothing more then excessive topiary skill and being of little use due to structural integrity for actual work. It was only with the revelation of possible uses- and the clear financial benefit- of the farmed gears that the plant was hailed for the marvel that it is.

Monday, July 2, 2007

Project : Blue Fuzzy Cube Monster

Project : Blue Fuzzy Cube Monster
Date : Off and on through May and June
Materials : Fake black feathers, blue fake fur fabric, blue checkered fabric, pipe cleaners, wire, blue yarn, orange embroidery floss, beads, Styrofoam foam, stuffing, thread, magnet
Tools : Needle (straight & curved), sewing machine, pliers
Finished Product:

Given to a co-worker to adorn his cube.

Process: A wedge of Styrofoam for the head, a structure of pipe cleaners, and a bit of stuffing for the torso. The wings were sewn separately as one long continuous piece- though fingers and feathers added after the joining. The fingers consist of a looped wire and two separate sleeves of patchwork blue to cover it, both sewn to the wing. The tail was wrapped in yarn before a separate piece of fur fabric was added to cover the joint. What fabulous thing this fake fur is, it hides every stitch so that segments join nearly seamlessly!

The magnet is tucked behind the the wings where they connect to the breast. After construction, some basic blue beads were sewn into the rump for flare. The eye sockets embroidered with orange (after a failed attempt at gold spots embroidered on the torso) were topped off with white bead eyes. Down the neck there are five little "spines". These consisted of a long bead topped with a small blue bead to allow the thread to loop back inside the long bead for a very clean look.


Thoughts :
There is too much blue and not enough detail. The fur, while fantastic for joining of parts, is too think and irregular to support embroidered patterns. This saddens me though I wonder if it's a matter of scale. The creature is small in order to stay light enough for the magnet. The pose-able fingers, wing, and tail please me greatly. The important thing is that my coworker likes it. The original idea was to have a thicket of pins protruding from the fabric on the rump like spines on a porcupine. The creature softened as they always do during construction and came out almost cute.

C - new owner of creature, S - female coworker, R - me
... the monster is examined ...
S : What is its gender?
C : I don't know...
S : I checked and you can't tell
R : You never can, with birdlike things
... time passes, monster is played with ...
R : Oh! Oh! Put it against the wall, it'll stay
S : It doesn't seem to be staying...
R : Rotate it forward, its got a magnet in its chest
S : Ah, that worked. A magnetic chest?
R : Indeed! Ah! I guess we know the gender now
[R leans forward and stares most obviously at S's chest]

Sunday, July 1, 2007

Project: Bullet Bugs

Project : Bullet Bugs
Date : Weekend of July 1st, 2007
Materials : bullet casings, pins, solder, flux, a tiny watch part, some screw extender part, tiny sliver of copper tape
Tools : Soldering iron, pair of pliers, tweesers, knife, clay
Finished Product:


Process:
You take some pins, bend 'em. You take some casings and slap some solder down. Solder the tips of the pins and then join 'em. Ta-da! Very easy. The "snout" of the silver headed one didn't want to take to the solder so I laid down a strip of copper tape that Trisha had given me from her stained glass supplies.

The proboscis, which came from a watch winder I think, was lost in the wilds of the rug for no short period of time. But I was intent on that look, no other part would suffice! And so I brought over an unshaded lamp and proceeded to examine the carpet. I felt much like a crime scene investigator, waving my magic light in search of that one little speck.


Thoughts : -- will hunt inspiration links down later. Mainly, I wanted to use pins.
Written by Eric & inspired by Rival Guy:
Bullet Bugs:

Due to poor accuracy, mostly harmless in small numbers. But disturbing a swarm will lead to a synchronized attack that showers an entire room with bullets instantaneously.

Afterwards, their surviving kin will come and reclaim their corpses to cannibalize parts for building others. They'll also check the corpses of their victims for munitions to build new members. They can convert nearly any type of round. Large swarms have even been known to convert artillery rounds into their own, leading to the military's abandonment of several bases after their munition stores became infested. There are unconfirmed reports of one swarm attempting to convert missiles...

Everyone else was doing it...

Normally I post to my personal, informal blog- not to be named here. But, as others have pointed out, that's not a very professional medium. So I'll be double posting for a while, but leaving the more "me life" stuff behind as I transfer content over.

I mostly draw, and sometimes create things. Hopefully projects - perhaps with explinations of how- as well as movie, book, concert reviews will be posted here. Maybe even fiction?