Showing posts with label time: long. Show all posts

Monday, January 18, 2010

In-Progress

Project : Unnamed
Date : 1/18/10
Materials : Yarn!
Tools : Crochet Hook

Current State!:

Thoughts :
I wish I didn't post so infrequently... and try as I might I can't produce creations faster... The compromise? Post in-progress reports.
They're playing Rockband downstairs.... When discussing this fellow, the idea of a more awesome version with stake knives, rather then suction cup, feet was suggested. If it wasn't already promised to Adam, I'd switch.... The idea of a larger creature, with coin scales and a large butcher knife fin/spine was also discussed... with fishing hooks for claws....

Sunday, January 10, 2010

Upcoming Posts - Doug's CD Exchange party '09-'10

Project : Post a review for each CD
Date : 1/9/10 @ 8pm
CD count : 10 (including my own) + possibly 2 more later

What?: Adam and I were kindly invited/allowed to be part of Doug's CD swap this year. Thirteen people total were involved this year. The goal- create a mighty fine mix CD and then make 12 copies of it and in return receive 12 new mix CDs. This is our second year and both times we had a great time and spent a lot of effort on our playlists and CD packaging. Others spent more time, others spent less time. For us though it was great fun to talk about music (Adam much enjoys speaking at great lengths about music, he has a vast collection, varied taste, and great memory for such things) and to design a mass produced art project (the packaging quest was my favorite stage)

The goal: To make a blog post reviewing each individual CD. Last year we listened to them but not much came from it. This year I hope to meditate upon each and share the details of it as well as my thoughts. I will be reviewing both mine and Adam's as well. Please let me know if you would like particular tracks from a CD.

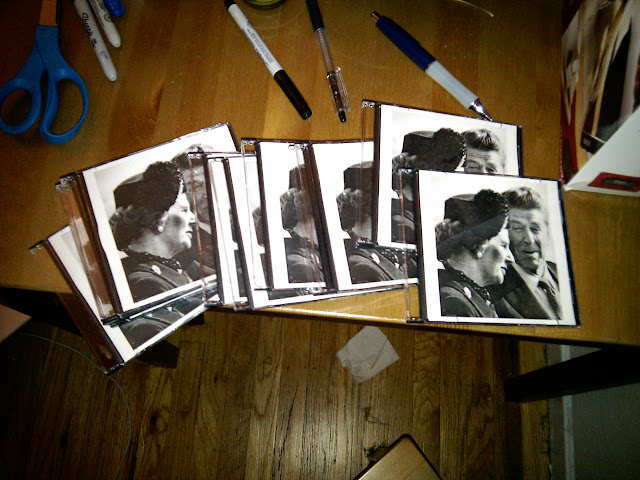
Finished Product: In the mean time to hold you over, here are the piles of CDs that Adam and I brought to the party.
CDs for exchange '09-'10
Rebecca's CD collection


Adam's CD collection

Sunday, May 3, 2009

Project : Casting with Crayons

Project : Casting with Crayons
Date : April 2009
Materials : Crayons!, Tap silicone RTV A & B (blue), lots of paper towers, tape, super glue, hot glue, poster board, clay, things that I wanted to cast
Tools : Saw, glue gun, candle, lighter, aluminum can, stir stick, disposable measuring cups
Finished Product:
Casting results


Process:
Second Mold setup

Part A : Make the mold
To make the mold I cut out the box pieces from poster board and hot glued them together. I then just stuck things where they would fit- using two methods of attachment. A: clay! just stick it to the wall and stick the item into the clay. The end. B: Tape and glue! If I had double sided tape, this would be way easier... but I didn't... so I glued the non-sticky side down and stuck gears to the sticky side. After I was set, I mixed up the silicone mold as described on the side of the bottles. It's a mess, I wont detail the steps, they're already written down on the product. But *so* messy. Note: I used un-baked clay and it greatly slowed down the drying of mold touching it. The tape did as well, I believe.

Part B : Cast with crayons
Take your average soup can and wash it out & dry it. Throw some crayons in it. Light a candle. You can hold (with your fingers! How neat!) the can over the flame and melt the candles. Careful- the can get warm if your holding it near where you're warming it... experiment, you'll figure it out quick. Pour into molds! Tada! It dries super-quick for the shallow molds but deeper ones of course take longer- I just threw it in the fridge to speed up cooling down. I found that if I pour a bit, pushed it down with a stick and poured some more there was no structure issues and it filled the mold out more (for the gear teeth).

Thoughts :
Tape method works really well but still having difficulties... how now to prevent/remove the excess/overflow on top of the mold? Hmmm.. For things like the screw, rocking the screw back and forth a bit in the clay pre-pouring to allow the mold to inch up & around a bit more helped. The varied speeds of drying freaked me out, but now I know! The hand mold is difficult to remove, but none other are...

They're cool, but I'm not sure what to do with them... re-melting the gears is a pleasure to watch. Haven't tried to draw with them yet, so I don't know how sturdy they are. They respond well to modification via a heated needle after they've dried.
My current goal is to eat a computational machine. A thing that does something- I want to eat it. Consume it entirely. Ever seen the movie Ravenous? Sort of like that... I've given a lot of thought about how to consume circuitry, but I don't see how it'd work... so now I'm settling on a mechanical device... my goal to to better my skills with casting so I can buy food-safe silicone and create wonders... movable, edible, yummie wonders.... some day...

Wednesday, April 15, 2009

Project: Squeaky Mule

Project : Squeaky Mule
Date : Winter 2008-2009
Materials : Yarn (3 types), fabric (2 types), 2 beads, pipe cleaners, stuffing, thread, squeaky bladder from cat toy
Tools : Crochet hook, scissors, needle, cat brush
Finished Product:
Squeaky Mule, sittingSqueaky MuleSqueaky Mule


Process:
Squeaky Mule, in progress

I don't remember much about this project. I think I just started going with the purple yarn, letting me head wherever. I made sure it had a large enough butt for a squeaker toy (purchased before starting the project) and that it was long enough for 3 pairs of limbs. I crocheted the main part of the torso in the purple, then continued on a bit with the darker purple.

I stuck simple pipe cleaners through the body to get a fill of the size and placement of all limbs as soon as I could. These worked as guides for the rest of the project and were very helpful. I then crocheted the thighs- brushing the patches that I could as I went.

After most the brushing (though I continued to do so all the way throughout), I cut basic tubes of cotton fabric and sewed them to the leg stumps. The folds at the joints are actually sewn in- this definitely helps with shaping. I capped the bottom of the feet with a sort of satiny fabric.

The head was the same satiny fabric (the lower jaw, I thought for some reason, should be crochet and so I extended a patch of the white down there prior to sewing. I cut the pattern pieces for the head as I went and hand stitched it all together very hap-haphazardly. Luckily, the head isn't many pieces- a lower jaw, a top of the muzzle, and then a forehead. I added the eyes and then cut tiny scraps and sewed them down for eyelids/eye shaping. Vital for finishing the piece.


Thoughts :
Far more "cute' then I was expecting. An easy, relitively quick for crochet, mindless project with good results. It can both stand (on sufficiently rough surfaces) and sit in a very adorable manner. The eyes are so soulful and shiny and tiny! For some crazy reason I thought of making the head a skull- hence the pealed back yarn from the face, but wimped out in the end and just did it fabric. However, several people have commented that it looks rather skull-like. This makes me very happy.
I know it's just a toy. A long coil of string that has been fashioned into a shape by my hand. It has no soul nor life inside it- it has only the stuffing and squeaky bladder I put in it. But... I am unreasonably fond of this creature. Purhaps it's the pile of limbs that it looks like when it sits. It's shiny eyes that reflect the bright points of light, no matter how dim or diffuse, have such emtion as they peer from the scraps of fabric I've fastened around them. It's just things I've shaped, but makes me want to coo at it, snuggle it, and protect it.

Wednesday, April 8, 2009

Mutated Monster

Project : Mutated Monster
Date : mostly February & March 2009
Materials : Yarn, felt, fabric (2 types), wool (3 types), wire, 2 beads, magnets, thread, stuffing
Tools : Crochet hook, scissors, needle, needle felting needle, pliers, cat hair brush
Finished Product:
Gross MonsterGross Monster


Process:
At some point I made the body. It was a long time ago... back when I worked on the skeletal monster I believe... ages ago (as in sumer 2008?). Anyway, at some point in time I had made this mint green kinda' kidney shaped body that had been somewhat brushed. From there, I continue on....

I finished off the body with a couple green stitches to close the tummy and extend the neck up a bit. Then I brush it as thoroughly as I can. I then push some wire through it for 4 legs (of course I was thinking 6, but I just never got around to squeezing in the other 2). A friend comes over and so I'm talking about needle felting and we just sorta' go at the body willy-nilly with whatever wool I have. The spots and stripes and gag-worthy pink... "stuff" is added then.

Deciding that I'm not crocheting a single stitch more for this, I start to sew. I to a pinch of brown felt on the thighs of the hind legs and then follow it up with brown fabric. The legs are slender and the shaping coming almost entirely from the wire within. At the end, I put a tiny magnet it and close it off with a felt sole. Repeat or the other leg. Because this is now a felting project, I go hog-wild just stabbing some brown stuff onto the felt thigh. Not a lot of planning there. I don't want to work to hard on the project so the for-legs are just fabric. No felt means no need to cover with needle felting. Included the magnet though. This means the monster can stand against a fridge on all 4 legs.

The head is sewn on, made out of felt. There's weak attempt to make a wired jaw but the jaw wires are never anchored to the fabric and so it's sorta' lame in the end. A scrap of red fabric is just wedged in there- the whole skull tossed together rather freely. No pre-planned pattern, just rough shapes drawn out as needed and cut. Two *large* ears are sewn on. The head starts to get wool felted onto it... one ear is attacked by the needles but it turns out to look rather stupid, large, and floppy. The second ear (visible in the pictures above) remains untouched. Bead eyes are added on, basic eyelids added, and more skull felt. And then the project just stops. It's not really "finished", but I'm done.

Thoughts :
I'm just happy to get it done. It had been just a stupid body laying around for ages. It was either this or toss it. I like how evil the face sorta' looks. Sewing with felt was fun- it's *so* easy to work with! It however looks terrible to my eye. It was sort of liberating to say "To Hell With It!" and felt whatever. I'm sad about the ears... and *very* sad I didn't do the mouth right. Rather then be positionable, it's just sorta' lumpy now and forever hanging slightly open.
The eyes! The beads I selected (at the last moment) are awesome because they're vaguely yellow and look as if they glow. Gives him a sort of evil blind monster look.
Being highly positionable and on the fridge is fun- I just wish the magnets were stronger since he can't really hold anything up on his own- other then himself. Wire frame + magnets... not wise.
I let Mel felt some wool onto him. She seemed shy at first- here was my creation and I was giving her my blessings and craft supplies to alter it. I'm not sure how many stabs it took, but after affixing her second tuft of wool she seemed gleeful and giddy. There can not possibly be many things in the world as awesome as discovering a new craft. It's not merely learning how to do something. It's learning that there's this whole new possible way of making things. It's so new that you can't even comprehend doing it wrong- your eyes simply glaze over at the thought of doing it at all.

Sunday, January 4, 2009

Project : Mr. Muggles

Project : Mr. Muggles
Date : July 2008 - September 2008
Materials : Yarn (3 types), fabric (2 types), beads, wire, chain, foam, stuffing, tiny buttons, thread, glue
Tools : crochet hook, pliers, scissors, cat brush, needled, hot glue gun
Finished Product:

MrMugglesLeanMrMugglesPofile
Mr. Muggles : done


Process:
MrMuggles1MrMuggles3MrMuggles2


First panic because there's a set of restrictions applied to the project that you must meet (see below). Then just sorta start crocheting and see how you feel. Start at the neck and work down the body, putting a hunch in for shoulder blades. When done, go back and work from the neck up, including a bulge at the back so a stocking hat that you're never actually going to make can be worn.

Avoid finishing/fleshing out the face because you're afraid and go back to work on the body. Half-assedly stick some wire through the body where the limbs are but since you didn't wire a spine, it doesn't really do all that much. Crochet some limbs! But not all of them at once, because that would be commitment. Skip around between legs, stopping at the knees. Add a super stubby fox tail with a white tip. Then start brushing the body with a cat brush because you're too eager to try it out rather then waiting like a sane person. However, realize that this look is not actually a good one and stop before you destroy the entire piece. The end of the project will have brushed haunches, rump, and tail to cover for your failed experiment.

Suck it up because you have to and go back and finish the 4 limbs you got. Use black instead of red because you still have foxes on the brain. For this same reason & the beard requirement, use white for the lower jaw of the face. Crochet basically a bent O several rows deep around the mouth, then cut fabric to shape and sew it in. Bend a wire in place on the "inside" and sew that down as well. Now pull out the red and finish off the head. Be sure to build up around the brow region with sharp increases/decreases and doubling back for shape.

Because the requirements call for it, go back and stick more wire through the body where it looks like you can, and crochet another pair of arms. Then select the most adorable little black matte beads and use them for eyes. I confess to not remembering how I did the nose....

At this point embrace the fact that your 3rd pair of limbs looks terrible, especially where they join the body. Therefore draft a vest pattern and sew it together to hide this yarn connection. Don't sew it directly to the monster itself, but feel free to sew the arm holes and hem it while the toy is wearing it so that you need only make it look good while worn. Also, don't worry about arm hole size, the vest is never coming off you decide because you sew the vest flaps closed when affixing adorable little buttons to close it.

Realize you still have hat + glasses + beard requirements. Shred some nice white yarn to get those wool chunks that make it. Use a yarn needle and thread them through the chin and hope no one pulls too hard on them. Bend that wire you used for armature into the shape of eyeglasses and then solder the bends together to make it stronger/not look as tacky. Leave a wire protruding on one side so you can shove it into the nose and have it stay. Because the monster is beginning to look posh and because the glasses easily fall out, take a segment of necklace chain and solder it to the glasses and sew the end to the vest. Then use foam to make a top hat- a rectangle, circle, and doughnut shape being cut out and hot-glued together to do so. Now stop before you ruin it.

Thoughts :
Mr. Muggles originally started out from a list of requirements, put forward during a Ravelry exchange. The list : “Head: Beard, Long Pointy Nose,Open Mouth, Extremities: Big Ol Feet, Extra Arms/fingers, Body : Scales, Extra Bits and pieces: Hat, Glasses”. "Ugh!" I thought. What a terrible list to work from. The beard, hat, and glasses made it far too human for what I normally like to do. For some reason I was positively gripped with the notion of a fox early on. I also desperately wanted to apply the "brushing yarn" technique I had heard about. There were a number of sketches done for him, before and during the process of his creation. For the longest time he looked older and wiser- a longer beard, simple un-chained classes perched at the tip of his nose, and a stocking knit sock cap with a bell on the end. Phfff... How quickly things can change when I'm actually crafting something.

The clothing improved him greatly, helped define the body. The brushing of the red failed because the red was too solid and the creature lost form. Sad. The hat idea I had gotten from a friend's gift. I'm only mildly sad that I forgot the "big feet" requirement. The open & wired mouth was positively awesome. Fun and very expressive.

In the end, I love how nervous and stuffy he strikes me as.

Mr. Muggles fidgeted with his glasses as he lifted the saucer and took a tip of tea from a delicate china cup. This whole situation was quite distressing and it appeared that, after his fifth cup, simply sipping tea and hoping would not make it disappear. The velvet that the mechanism had lain in was still indented with it's shape- the glass shards of the display case simply dusting the fabric hills and valleys without disturbing them.

It was gone and he, the curator, had no idea where it had gotten off to. All the devices on display weren't wound- he shuttered to think of what level of chaos would be obtained if even a crank or two were applied to some of the artifacts. If the device certainly hadn't made off on it's own, then what? None of the others had been touched. Why just this one? Muggles lifted his cup again but found it to be empty. Sighing heavily, he set it down on a nearby, intact case and hunched down to think. His fuzzy black paws fidgeted with the phantom archival tag he could already imagine tied about his leg. Oh heavens above, she was going to send him away! He looked around, forlorn. He needed another cup of tea.

Project : Caterpillar Mermaid

Project : Caterpillar Mermaid
Date : August 2008
Materials : Yarn (3 types), wire, stuffing, fabric, thread, pins
Tools : Crochet hook, pliers, sewing machine, needle, scissors
Finished Product:
FuzzySnake2 FuzzySnake3


Process:
FuzzySnake_inProgress2

I'm pretty sure I started this ages upon ages ago. And by started, I mean crocheted a basic torso with a tiny V of off-white yarn on the breast. Half crocheted a torso. And put it away for a very long time. Well, along comes August and I pull it out and decide it's too tiny to put your normal limbs on. So I extend it down and down and down further into a snake like shape. Towards the end I give it a couple ring-tail bands of white-white yarn to spice it up. I got back to the top and crochet up a neck/back of the head. At this time, I've also shoved a long wire through the torso.

The scale at this point is rather small and a crocheted face will lack all detail so I switch to fabric. It wasn't meant to be so stubby, it just sort of worked out that way- made of three pieces : the brow, the "butteryfly" muzzle shape, and a tiny wedge underneath for a throat. A two wires are shoved through the torso for arms. That's two wires for four hands. The length of the arm has a basic tube of fabric tightly sewn down it which overlaps the fingers, which for one hand had wire running through them and the second were just folded fabric.

A final pair of legs are half sewn by hand and half with the machine. A wire is stuck through the torso and the legs attached to it. The toes are wired. To finish it off, two black-headed pins are stuck into the face for eyes.

Thoughts :
Pre-final legs, the monster looked really cool. And if I had spent more time on the hind legs, it still might have been cool (remember! Always sew the joints you want! Don't just depend on wires alone for shaping!). The time was not taken, however, since it was a gift to my parents and I was right up against the deadline. The wiring was included so that it could be posable throughout their cubes. They liked it. My mother however considers the pins to be nostrils rather then eyes. Interesting. The degree of pose-ability with this thing is lots of fun, I really wish I had had the time to make a stop-motion clip with it.

There is a woman who I speak to when I go to the drawing group Dr. Sketchy's. We admire each other's work and chat, me somewhat shyly and her with the obligatory crazy-artist zest. During these periods, I often pull out whatever my current in-progress craft project is and crochet in the long pauses when the models take breaks. Being nice and polite, she comments on them and some times makes observations on what they look like in their unfinished state. This one she observed minus the hind legs and declared it to be a Caterpillar Mermaid! I like it.

Project : Bat-Bunny-Dragon

Project : Bat-Bunny-Dragon
Date : January 2008 - July 2008?
Materials : fabric (satin black, furry black, red satin), yarn, foam, stuffing, beads (teeth & eyes), black electrical tape, wire, white out, thread
Tools : sewing machine, crochet hook, needle, scissors, pliars

Finished Product:
BunnyBatDragon


Process:
Bat Dragon

Make a basic wire-frame body for the torso and wings. Randomly cut out scraps of fuzzy black fabric and sew together the torso. Tape up the "fingers" of the wings with black electrical tape. Cut satiny black fabric to size and sew to/around the electrical tape. Leave enough on the bottom of the wings to fold over and sew. Paint a white line of white-out along the edge of the wings (where the fabric is doubled). Cut a thin strip of fuzzy fabric and sew along the "arm" of the wings.

Crochet a "tube" using fuzzy black yarn for the neck. Add more wire to the armature to make up the head and neck. Slip fuzzy neck over it and sew to torso. Crochet a couple final touches onto other end of neck. Randomly cut & sew up a narrow lower jaw with red fabric for inside the mouth. Randomly sew up the top of the head. Think long narrow triangles for the whole thing. Affix both to the neck and each other (can't remember the order) and slip some wire into them at the same time. Cut out some foam ears, attach to head with slight curve. Add eyes. Use a bunch of tiny triangular beads and sew along lip-line for teeth.

Switch to the other end. Add more wire, cut a big triangle of fuzzy black fabric, fold in half, sew to butt, then sew up seam around wire, stuffing as you go. At the very tip, just tie down some white stuffing for a POOF! tail. Switch back to legs and FREAK OUT. Then give up and sew two tiny tubes and affix them to the legs. At this point, call it quits.

Thoughts :
This went from having amazing potential, to being meh, to sucking, to settling on meh. The in-progress photo is my favorite. The head was neat, but I didn't scale it right and so it threw off the whole project. But the time I got to the feet, I just gave up because nothing would fit with the totally wacky scale I had going. Oh, by the way, there was a near six month gap between the awesome stage and the "I screwed this up" stage... But I've reached the point where a stupid finished project is better then a potentially-awesome unfinished one.

The original design was based on this character created by a friend. The wings were awesome for it, and the scruffy neck... but when I stuck the head on there it was, like, 100 times too large and threw off the entire project. The wings look awesome, but are time consuming to make so that's why I ditched on the original tail design as well.

I've come away from the project with a good wing design/approach, a finished project, and a so-so monster that I can hang in interesting places using it's wired tail. Also learned- I can come back to projects and should! Because as lame as they look, they still look better then something with protruding wires that only I can "see".

The creature wobbled forward a couple steps and then two to the left. It shook it's head and chirped. Leaning back on her chair, the woman took the pins from between her lips and handed them to a plump sewing assistant. Sticking them into it's back, it waddled off to the corner of the desk and hunched down. The new creation cheeped and stuck out it's luxuriously maned neck- it's large head bobbing and swaying as it watched the sewing assistant. A long and crooked tail thumped the desktop twice but the woman picked the creature up just as it tried to spring forward.

Her long fingers closed about it's torso, holding it's wings against its body while stubby little feat kicked frantically below. The friendly bird sounds were replaced by a low growl and hiss before it's jaws locked onto her thumb, worrying at the flesh with its nubby little teeth.

"Perhaps I can use it as a decoy," the woman said with a sigh. "It seems noisy enough, and I must have miss read my measurements at some point because at this scale those wings will do nothing but drag." Shaking her head, she tossed the poor thing over her shoulder and went in search for the miss-placed decimal point somewhere in her calculations. Warbling deep in it's throat, the creature picked itself up off the floor and waddled forward to mingle with the other things shuffling about the laboratory.

Wednesday, March 12, 2008

Project : Skull Bear

Project : Skull Bear
Date : January 2008
Materials : Wire, tin foil, clay, white out, hot-glue, a pinch of fabric, yarn (2 types), thread, beads (temporarily)
Tools : Crochet hook, needle, hot glue gun, oven
Finished Product:
Skull Bear FinalSkull Bear Final


Process:
Skull Bear : rough finishSkull MonsterSkull Bear : rough finish

Given that I'm a poor sculptor, I started with the head. Looking back, I would have started with the body- as I do with almost all my projects- and *then* done the head. Sigh. Live and learn. Anyway, I bent some wire and used some tinfoil and then some clay and BAM, I made a skull. Of course I was desperately looking at photos while I did this and it still sucked. There's a skull top and seperate jaw, mind you. Baked them, then painted 'em with white-out. Started crocheting the bear. Had massive, massive, *massive* problems sculpting it correctly. Left a gap at the bottom and also inserted a wire spine. Got glued a scrap of fabric to the clay bits and then sewed that to the yarn. Had difficulties sewing it such that the two would line up. Then I crocheted the limbs. Put very stupid looking beads on as claws, closed up the rump and called it good. Went away for a while, then came back to it. Sculpted clay claws and then went over the chest with some re-shaping crochet and added an (ugly) tail. During this all one of the teeth broke off but was easily hot glued back on and then repainted with whiteout. Several paint touch-ups were needed throughout but luckily whiteout is easy to find, use, and dries fast (the reasons I picked it)

Thoughts :
Good first try. Interesting idea I will have to try again. Skulls are a bitch though- hard to draw, hard to sculpt. Toy was made upon request for Moonykins for the Ohantra character. You can see I was less successful adapting this one- moved it from an on-all-fours character to a more doll-like form. Also the shaping around the jawline failed despite my best efforts. Really, I blame working head-first for most these problems. It's actually really fun to play with. I like making the mouth open and close to sing along with whatever I'm listening to. The sculpted claws are also quite awesome- the hands are individual claws while the toes are fixed in a row.

Project : Furry Doll

Project : Furry Doll
Date : Feburary 2008-March 2008
Materials : Fabric (white, pink, orange, green), pink wool, yarn, thread, stuffing, embroidery floss (green, black, pink), rice?
Tools : sewing machine, needle, scissors
Finished Product:
Furry Toy

Process:

Shockingly simple once the basic form of the head was settled on. Unfortunately I shipped the toy of months ago and cannot remember/figure out from photos how the head was shaped... I think there was a connection between head and neck, but maybe not? You can tell there is a clear connection between neck and body. Head and body were connected, then the legs made, compared, and then connected. Next the arms were made, compared, and connected. In both cases an incorrect limb was made that was discarded. Filled with rice (I think?) to achieve a heavier feeling. Very basic. The hair was small chunks of wool pulled through the fabric. The eyes, eyebrows, and mouth were embroidered on while the nose was an actual scrap of fabric. The headband and tank-top straps were yarn. The cloths were extremely basic in design- basically just tubes and the straps are only tucked into the shirt, not sewn.

Thoughts :
So much disdain for this project! Ick! It was an interesting practice on matching a photo and doing something I didn't find interesting. The character was made for the real-media-exchange and then mailed off. It was based off this character. I know a lot of what I would call furry artists on the net and a couple mild "furries" but the more hardcore furries freak me out.

Despite my loathing of it, I *do* think it turned out really well. There just some poor puckering around the snout but other then that it's a good match. It's important to note how much better the doll looks with the cloths- a major improvement for minor work. The hair was sooooo much fun to do! I'm excited to try it again. The fabric was of poor quality and it took quite a beating pulling those chunks of wool through it, but it survived and playing with the hair is by far the best part of the doll.

"Glowsheep : Most cursed project ever?
I should honestly just mail this off ASAP before my house burns down or something.

Started off by losing the needles I was using/needed for it.
Spent half an evening searching for my white thread.
Then I lost the vibrant orange fabric for the pants.
Then I lost the right thread for the blouse top.
Then I lost my CAMERA to take pictures of it."
-- excerpt from my post saying I'd finished the project. I lost something else as well, but can't remember it at the moment

Project : Mook-Mook

Project : Mook-Mook
Date : February 2008
Materials : Yarn (2 colors), wire, stuffing, embroidery floss (black), fabric, thread, beads
Tools : crochet hook, needle, sissors
Finished Product:
Mook-Mook1Mook-Mook3Mook-Mook2


Process:
MookMook : Early Stage

With the crochet monsters there is both a technique and a wild attack that goes beyond words. Some day, I'll write up the technique...
I started at the throat and crocheted down. Giving a monster a "tummy" may make it look better, but switching back and forth between the yarns as you makes for a less fluid flow. The mid-section has only a minor bulge relative to the thickness of the neck. Went from the neck and crocheted up one throat, then back to the neck and up a throat and most of a head. I switched back to the first head, finished that, and then finished the second head. Then the hind legs were added, the bottoms staying open. A two pieces of pipe-cleaner were stuck through the body and then crocheted (tightly) over on both sides to create the front arms. Little circles of fabric were cut and then sewn to the bottom of the feet. Some stuffing was affixed to the rump- I can't remember if it was pulled through with a hook or needle or flat out needle felted on. The ears were added- nubs of crochet with a tiny triangle of fabric sewn on the back. Eyes were added and then little triangle noses sewn on with floss. Somewhere in there I went back and crocheted over the chest a bit to correct the shaping.

Thoughts :
I don't know where the name Mook-mook came from, but it struck me day one and stuck. He was created for a Ravelry craft exchange based on someone else's sketch and I'm very, very sorry to see him go. I'm fond of the girl he went to though and I got a *fantastic* creature in return so I don't regret doing so... but still there's sadness. This is the first of my monsters that both the Greatest Living Philosopher and I like.
Despite looking so cute at the end, he went through some rough times. At a Dr. Sketchy's session, the lady next to me said it looked like a penis wishbone mid-way through. And when I was picking up eyes, my friend claimed to be highly skeptical of how it would look... although seeing the final product I know that the eyes are the key to the "cute" look. Relatively easy to make... the rabbit tail idea was random and I should do pipe-cleaner arms like that more often. Last thing to note is the tag. I saw many tags like this at the Swedish Natural History museum, hanging from the legs of long dead creatures, some times typed, sometimes handwritten. I feel they bring a sort of credible, sophisticated look to the creatures that I strive for. This one was lovingly made and I feel really adds to the look. (The tag was nabbed from work... I NEED to find where it comes from so I can buy handfuls of them)
The tag reads:
    Mook-Mook
   Mookion mookus (in italics)
   First seen by Pam M
   Caputred by Rebecca
   Winter 2007-2008 (in italics)

Sunday, November 4, 2007

Project : Squid Kitty aka Octo-puss

Project : Squid Kitty
Date : September - October, 2007
Materials : Fabric, ribbon, a bell, thread, stuffing
Tools : Sewing machine, scissors, straight needle, curved needle
Finished Product:


Process:

I'll be upfront that the kitty head is not my creation. I nabbed that from the book Soft Animals A to Z. The neck down was simple but of my own doing. The ribbon & bell not only looks awesome by really highlighting the kitty aspect, they also nicely cover the seam between the two parts. No eyes were really fitting and so were left out- only the scrap of fabric for the nose.

So, to start with. Make the head. I want to say it was 4 pieces of fabric- muzzle, sides of face, top of head... maybe a chin piece as well (I don't have the critter on hand at the moment). After that, it's simple. I used 3 large pieces of the white to make the body and individual strips for top of squid legs- on the body: one for either side and a dart down the front to help for shaping (since this had little pre-planning).

Interesting note about the body/tentacle joint shaping: it looked very much like V-V-V-V per side. Note that the segments between the legs actually extends down past the start of the tentacle. This fabric was cut on the side like so |_|_|_|_| , folded up under itself and sewn to the tentacle leg. This made the webbing and the lack of seam between it and the body really improves the look. Keep in mind that the webbig will "bow" nicely since the legs sit between edges that used to be connected- no fabric is removed from the body!

Wedges of pink (slightly longer and thinner then their white tops) were cut and sewn to the underside of the tentacles before the tentacles were attached to the body. The center was very mushed together, I just folded and sewed the ends of the pink wedges together and then pushed them (with a still open seam in the very center) up into the squid kitty body. Not a bad look (the opening isn't visible), easy, and allows for future work.

Thoughts :
Very awesome looking though sadly made out of the cheapest fabric I had since it was only supposed to be a random project. The lack of eyes goes very well with the squid half of the body. If I had done this a smidgen more professionally, it would be my most marketable creature by far. The fact that I used someone else's pattern for the head (it was VERY educational!) makes me feel as if I cheated though. I desperately wanted to add suckers to the bottom- tried buttons, embroidery, even actual suction cups. Sadly they all looked foolish. I've got one last idea of coiled yarn, but I don't feel I should spend any more time on this project. Perhaps next time. I'm considering a higher quality version that is ACTUALLY a squid... The idea initially comes from Neal's response to my "give me stuffed animal ideas!" post- her answer: "squid cat", the Greatest Living Philosopher directed me to put the tentacles on the bottom and not the face, and the opening scene of The Scar with the hunting squid was a strong inspiration as I worked.

Given its lack of eyes and albino coloration, it clearly dwells in the Deep. And what is any cute little kitty, with it's snow-white fur and little bell upon a ribbon without the accompanying Miss who owns it? What better pet for Lady Cthulhu than this little kitty... thing?

Monday, October 1, 2007

Review : Book : The Scar

Book : Perdido Street Station, by China MiƩville
Data : mid June 2007
Genre: Steampunk

Brief, spoiler free review : Perdido Street Station is a cruel, cruel story. It is a breathtakingly well described and beautiful in its detail, even when describing the most evil or wretched of things. I'm more fond of The Scar, but such is the side effect of starting mid-series I find.

As usual, if you can stomach it, I recommend reading the story without a clue as to what it's about. Avoid that dust jacket summary and dive right in.

Review:


Inspired Sketches:


Lin & a cactacae


Wednesday, July 11, 2007

Review : Book : The Scar

Book : The Scar, by China MiƩville
Data : Finished some time around the end of May 2007
Genre: Steampunk

Brief, spoiler free review : I believe the most vital bit of wisdom I leave this book with is: "Be careful what I wish for." See, I came by this book through a friend with whom I pleaded and begged a reading recommendation from. When asked for what I wanted, I firmly replied with these two facts: "An interesting villain" and "cruelty toward the characters." The first I found makes every good book great and every pithy book bearable. The second is something I don't run across often and am interested in. The lack of cruelty is no doubt simply a symptom of my predominantly fantasy based reading diet- dragons, magic, perhaps the occasional strong female lead, and always a happy ending. Mind you, this particular search had already been narrowed down to the genre of "steampunk". Not only does this book nail my request, it repeatedly beats me over the head with them, nearly leaving me to whimper and regret I asked for them in the first place. Nearly. I came away from the book immensely pleased with the blend of fantasy and clockwork tech, still reeling from the actions within it, and with a ravenous need for more by that author. If you can stomach the nauseous blend of depressing, vicious actions and puffed up pretentious language, I highly recommend it.

Review:


Inspired Sketches:


Tanner

Monday, July 2, 2007

Project : Blue Fuzzy Cube Monster

Project : Blue Fuzzy Cube Monster
Date : Off and on through May and June
Materials : Fake black feathers, blue fake fur fabric, blue checkered fabric, pipe cleaners, wire, blue yarn, orange embroidery floss, beads, Styrofoam foam, stuffing, thread, magnet
Tools : Needle (straight & curved), sewing machine, pliers
Finished Product:

Given to a co-worker to adorn his cube.

Process: A wedge of Styrofoam for the head, a structure of pipe cleaners, and a bit of stuffing for the torso. The wings were sewn separately as one long continuous piece- though fingers and feathers added after the joining. The fingers consist of a looped wire and two separate sleeves of patchwork blue to cover it, both sewn to the wing. The tail was wrapped in yarn before a separate piece of fur fabric was added to cover the joint. What fabulous thing this fake fur is, it hides every stitch so that segments join nearly seamlessly!

The magnet is tucked behind the the wings where they connect to the breast. After construction, some basic blue beads were sewn into the rump for flare. The eye sockets embroidered with orange (after a failed attempt at gold spots embroidered on the torso) were topped off with white bead eyes. Down the neck there are five little "spines". These consisted of a long bead topped with a small blue bead to allow the thread to loop back inside the long bead for a very clean look.


Thoughts :
There is too much blue and not enough detail. The fur, while fantastic for joining of parts, is too think and irregular to support embroidered patterns. This saddens me though I wonder if it's a matter of scale. The creature is small in order to stay light enough for the magnet. The pose-able fingers, wing, and tail please me greatly. The important thing is that my coworker likes it. The original idea was to have a thicket of pins protruding from the fabric on the rump like spines on a porcupine. The creature softened as they always do during construction and came out almost cute.

C - new owner of creature, S - female coworker, R - me
... the monster is examined ...
S : What is its gender?
C : I don't know...
S : I checked and you can't tell
R : You never can, with birdlike things
... time passes, monster is played with ...
R : Oh! Oh! Put it against the wall, it'll stay
S : It doesn't seem to be staying...
R : Rotate it forward, its got a magnet in its chest
S : Ah, that worked. A magnetic chest?
R : Indeed! Ah! I guess we know the gender now
[R leans forward and stares most obviously at S's chest]