Showing posts with label yarn. Show all posts

Thursday, May 27, 2010

Light-Bulb Raptor

Project : Light Bulb Raptor
Date : Fall 2009?
Materials : 1 lightbulb, melted red crayon, fabric (2 major, 2 minor), thread, yarn, wire, chain, stuffing, 4 beads
Tools : pliers, hammer, needle, scissors
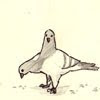
Finished Product:

Process:
Part 1 : Lightbulb.
So you take a lightbulb. Then you get a hammer and you smack it a couple times. No, not on the glass part. What you're doing is trying to chip the very bottom of the lightbulb where it screws into the socket- see, that part is glass down there too. You've got to chip the very sturdy & solid glass at the bottom of the bulb enough for you to get in there with pliers and finish the job. Knock out all the glass at the bottom, reach in and pull out the inner parts with pliers, and then clean out the inside. I don't know, but I assume that the white coating is bad for you. I assume the whole thing is bad for you. I tend to use a damp paper towel. Eventually I need to rince it with water, but I leave the used water out to evaporate and toss whatever it dried up in away (rather then dump it down the sink. Cracking and cleaning out lightbulbs is fun and mildly therapeutic, in my opinion. I often will empty a light bulb (once it's dead) for the fun of it, even if I don't have a project in mind.

Part 2 : Crayons.
I used melted crayon wax (red of course) to cover the raw end of the bulb, where I opened it. If you are only going to melt crayons once or twice (who could possibly stop at that??) then make little meth-head like spoons out of wire and tinfoil to hold the melted crayon over a candle with. If you're going to do it more (and you shooooould), invest in a basic metal ladle- I got a pair at a cooking store and have been exceptionally happy with my purchase. I also have one of those magnifying-glass/gator clip assistans that will hold the ladle over the candle for me. How cool is that? Anyway, I poored tiny bits of crayon in at a time and spun the bulb. As you can see, a couple drops slipped down but I'm happy more didn't spill. Less is more.

Part 3 : Fabric.
So I had this awesome bulb that looked mildly bloody. I sewed a tight fabric sleeve around it in red from which to build on. Realizing that making it the mouth/opening into some creature would just look too inappropriate, I drape a creature over it. First just the curved back in blue, with two blue extensions hanging down for legs eventually. Then a blue extension for the top of the snout. Then two slivers of white for the lips. Then a long white strip for under the throat. Now it's time to sew and wire the mouth. I can't remember if I sewed the wire down to the body fabric or to the red mouth fabric first. Always attach the wire to the fabric directly! Then I attached the fabric to the fabric. The head is done.

Cut white fabric for the inner thigh and sew up. As you're doing so, run a wire through and leave the "ends" of the thigh loose- we'll close them after we do the chicken legs. For the legs, take basic strips of gold fabric and twist them around the leg. Then take a thick strand of yarn and do a sparse twist around the leg. Then use pale tan (and hopefully mildly invisible) sewing thread (not embroidery floss!) to hold it all in place. Once the legs are done, go back and close up the thigh-- you should be able to tuck the ragged end of the chicken legs under the thigh fabric for a cleaner close. Add a pair of black beads for claws (I didn't have enough for the hind fingers sadly)

Now consider the tail. Note that even now with the very posable legs the creature can't actually stand. It's unbalanced unsurprisingly! So find a nice length of weighty chain. Simple rocks/rice stuffing wont work because it'll puddle incorrectly. The chain is a heavy weight all the way down. Hook that to the body (attaching to the wire in the legs for a good anchor), wrap with stuffing, and then cut fabric to cover it. Sew it all down and you're done.

Thoughts :
Cute! Super cute! I don't know why, but it's cute despite having a gaping wound as if a lightbulb had been shoved into it's gut. This took a comparatively quick time to make. One evening to gut the bulb and coat it. And then two evenings worth of work for the sewing (I think... this was a while ago....). I received several comments from the people at work about it- it's one of the most popular pieces so far. The tight fitting of the head/jaw wire really helps I think. The wide mouth is also intriguing- I often try for a "wedge" shaped head but so rarely succeed like I did here.

So the tail twists... so what. That's what happens when you pull your fabric to line up rather then cutting the patterns correctly in the first place.

At work I in theory used it to store a single pen. The bulb opening was too narrow for more then one pen/pencil... the mouth could hold one as well.... overall, far more good looking then it is practical.
A co-worker's young son was quite taken by the beast-y. The father even inquired the next day at work as to how one could make it. Imagine that! A young lad not normally given to the 'feminine' arts was so inspired by my critter he actually wanted to learn to sew so he too could make one! Thrilling! What better compliment is there?

Alas, while paper was cut before fabric there was no way to transmit the 'pattern'. How can you explain something that was constructed via a feeling and tugging of fabric? This is one of the most non-replicable creatures I've made due to the melding of bulb and fabric and wire. And so I wrung my hands and made vague mutterings and provided nothing useful. Typical. An excellent opportunity lost.

Monday, January 18, 2010

In-Progress

Project : Unnamed
Date : 1/18/10
Materials : Yarn!
Tools : Crochet Hook

Current State!:

Thoughts :
I wish I didn't post so infrequently... and try as I might I can't produce creations faster... The compromise? Post in-progress reports.
They're playing Rockband downstairs.... When discussing this fellow, the idea of a more awesome version with stake knives, rather then suction cup, feet was suggested. If it wasn't already promised to Adam, I'd switch.... The idea of a larger creature, with coin scales and a large butcher knife fin/spine was also discussed... with fishing hooks for claws....

Wednesday, April 15, 2009

Project: Squeaky Mule

Project : Squeaky Mule
Date : Winter 2008-2009
Materials : Yarn (3 types), fabric (2 types), 2 beads, pipe cleaners, stuffing, thread, squeaky bladder from cat toy
Tools : Crochet hook, scissors, needle, cat brush
Finished Product:
Squeaky Mule, sittingSqueaky MuleSqueaky Mule


Process:
Squeaky Mule, in progress

I don't remember much about this project. I think I just started going with the purple yarn, letting me head wherever. I made sure it had a large enough butt for a squeaker toy (purchased before starting the project) and that it was long enough for 3 pairs of limbs. I crocheted the main part of the torso in the purple, then continued on a bit with the darker purple.

I stuck simple pipe cleaners through the body to get a fill of the size and placement of all limbs as soon as I could. These worked as guides for the rest of the project and were very helpful. I then crocheted the thighs- brushing the patches that I could as I went.

After most the brushing (though I continued to do so all the way throughout), I cut basic tubes of cotton fabric and sewed them to the leg stumps. The folds at the joints are actually sewn in- this definitely helps with shaping. I capped the bottom of the feet with a sort of satiny fabric.

The head was the same satiny fabric (the lower jaw, I thought for some reason, should be crochet and so I extended a patch of the white down there prior to sewing. I cut the pattern pieces for the head as I went and hand stitched it all together very hap-haphazardly. Luckily, the head isn't many pieces- a lower jaw, a top of the muzzle, and then a forehead. I added the eyes and then cut tiny scraps and sewed them down for eyelids/eye shaping. Vital for finishing the piece.


Thoughts :
Far more "cute' then I was expecting. An easy, relitively quick for crochet, mindless project with good results. It can both stand (on sufficiently rough surfaces) and sit in a very adorable manner. The eyes are so soulful and shiny and tiny! For some crazy reason I thought of making the head a skull- hence the pealed back yarn from the face, but wimped out in the end and just did it fabric. However, several people have commented that it looks rather skull-like. This makes me very happy.
I know it's just a toy. A long coil of string that has been fashioned into a shape by my hand. It has no soul nor life inside it- it has only the stuffing and squeaky bladder I put in it. But... I am unreasonably fond of this creature. Purhaps it's the pile of limbs that it looks like when it sits. It's shiny eyes that reflect the bright points of light, no matter how dim or diffuse, have such emtion as they peer from the scraps of fabric I've fastened around them. It's just things I've shaped, but makes me want to coo at it, snuggle it, and protect it.

Wednesday, April 8, 2009

Mutated Monster

Project : Mutated Monster
Date : mostly February & March 2009
Materials : Yarn, felt, fabric (2 types), wool (3 types), wire, 2 beads, magnets, thread, stuffing
Tools : Crochet hook, scissors, needle, needle felting needle, pliers, cat hair brush
Finished Product:
Gross MonsterGross Monster


Process:
At some point I made the body. It was a long time ago... back when I worked on the skeletal monster I believe... ages ago (as in sumer 2008?). Anyway, at some point in time I had made this mint green kinda' kidney shaped body that had been somewhat brushed. From there, I continue on....

I finished off the body with a couple green stitches to close the tummy and extend the neck up a bit. Then I brush it as thoroughly as I can. I then push some wire through it for 4 legs (of course I was thinking 6, but I just never got around to squeezing in the other 2). A friend comes over and so I'm talking about needle felting and we just sorta' go at the body willy-nilly with whatever wool I have. The spots and stripes and gag-worthy pink... "stuff" is added then.

Deciding that I'm not crocheting a single stitch more for this, I start to sew. I to a pinch of brown felt on the thighs of the hind legs and then follow it up with brown fabric. The legs are slender and the shaping coming almost entirely from the wire within. At the end, I put a tiny magnet it and close it off with a felt sole. Repeat or the other leg. Because this is now a felting project, I go hog-wild just stabbing some brown stuff onto the felt thigh. Not a lot of planning there. I don't want to work to hard on the project so the for-legs are just fabric. No felt means no need to cover with needle felting. Included the magnet though. This means the monster can stand against a fridge on all 4 legs.

The head is sewn on, made out of felt. There's weak attempt to make a wired jaw but the jaw wires are never anchored to the fabric and so it's sorta' lame in the end. A scrap of red fabric is just wedged in there- the whole skull tossed together rather freely. No pre-planned pattern, just rough shapes drawn out as needed and cut. Two *large* ears are sewn on. The head starts to get wool felted onto it... one ear is attacked by the needles but it turns out to look rather stupid, large, and floppy. The second ear (visible in the pictures above) remains untouched. Bead eyes are added on, basic eyelids added, and more skull felt. And then the project just stops. It's not really "finished", but I'm done.

Thoughts :
I'm just happy to get it done. It had been just a stupid body laying around for ages. It was either this or toss it. I like how evil the face sorta' looks. Sewing with felt was fun- it's *so* easy to work with! It however looks terrible to my eye. It was sort of liberating to say "To Hell With It!" and felt whatever. I'm sad about the ears... and *very* sad I didn't do the mouth right. Rather then be positionable, it's just sorta' lumpy now and forever hanging slightly open.
The eyes! The beads I selected (at the last moment) are awesome because they're vaguely yellow and look as if they glow. Gives him a sort of evil blind monster look.
Being highly positionable and on the fridge is fun- I just wish the magnets were stronger since he can't really hold anything up on his own- other then himself. Wire frame + magnets... not wise.
I let Mel felt some wool onto him. She seemed shy at first- here was my creation and I was giving her my blessings and craft supplies to alter it. I'm not sure how many stabs it took, but after affixing her second tuft of wool she seemed gleeful and giddy. There can not possibly be many things in the world as awesome as discovering a new craft. It's not merely learning how to do something. It's learning that there's this whole new possible way of making things. It's so new that you can't even comprehend doing it wrong- your eyes simply glaze over at the thought of doing it at all.

Wednesday, April 1, 2009

Foo Man Choo-Chew Bear

Project : Foo Man Choo-Chew Bear
Date : March 2009
Materials : Yarn (3 types), fabric (2 types), wool (2 types), some wire, 2 beads, thread, stuffing, a battery, part of an old t-shirt, some tiny glass stones, a cat toy, stuffing
Tools : Crochet hooks, needle, pliers, sissors, needle felting needle
Finished Product:
Foo Man Choo-Chew BearFoo Man Choo-Chew Bear


Process:
Upon acquiring a neat skein of yarn, just start working on making something- anything. You can never go wrong with a fist-sized round-ish shape (a kidney shape would be better, but in this case the yarn was just too crazy/bitchy to take much shaping). Later, when you realize you've crocheted a lump, try to jazz it up by sticking a spherical rattly cat toy inside it. Hey, now it's a lump that rattles when you shake it! Make sure you line the inside of the creature with some fabric (old t-shirt) so that the stuffing doesn't ooze out. Oh, add some stuffing. Leave the bottom open for last-minute modifications later.

Switch to a softer, easier to use yarn and crochet up a stump of a head. When you get to the jaw level (top of the jaw), stop and sew down a mouth. Do this by folding some cardboard in half, trimming it to the right shape, taping tiny magnets to either side of it (the "outside" of the folded cardboard), covering it with red fabric, then sewing half of it down onto the yarn jaw. The magnets should cause the mouth to snap closed. When resuming crocheting, rather then grabbing the stitches the mouth is sewn to, make a chain as long as the circumstance of the mouth and work from that. Continue crocheting up and around. When you get half-way up the head, sew the upper-jaw yarn to the top half of the folded mouth. Now go back and finish the head (stuffing the whole time as you go).

Aim to make some stubby legs. Do a tiny pair on the front (in the end, they'll be the middle pair). Crochet them with a thick easy yarn- nothing complicated, just a tube. Then do the hind pair- crochet just far enough so that its ass isn't resting on the ground when it stands. Add a battery to the monster's rump to make sure it stays balanced. Close up the tummy.

Finish the legs by stuffing them, adding a couple glass stones/magic counters, then using tiny scraps of fabric to sew the legs closed at the end. Then add the forearms by sticking some wire through and crocheting down it. Make sure to bend the wire into loops at the end and crochet through & around the loops (it still wont prevent the wire from occasionally poking out, but it helps and hides any sharp points)

The main body is done! Now to add flair- select some really bulbus vaguely green beads, sew them to the head. Realize it's kind of hard to pry open the mouth so add a little mustache and goatee to grab onto. Note the vaguly oriental look the facial hair adds and cut & sew some fabric scraps down over the eyes to give it a heavier glaze. Looks more ancient and wise that way. No eyelids = stupid and/or anime looking. Fin.

Thoughts :
Bought the yarn totally randomly on trip to NY. Started crocheting it at a friend's house out there and found it fun (if not really a look I love). Came home and was compelled to finish it asap. I like how simple and carefree it is. The magnet mouth + wire arms makes him great to hold a note and a pen. Good office desk companion. Very random, very quick (for crochet at least).

Before he was given a face, Adam said he looked like an inset bear. The facial hair - added so the mouth was easier to open - was labeled as being foo man choo like. He has a mouth to hold and/or chew things. Thus the name.

It was unclear whether the bulbous shapes populating its back were the results of a terrible disease or merely the artifacts of an untidy hide. The creature's steps were short and far from graceful. Thin arms dangled down from its curving chest and swayed limply before it with every lurching movement. They continued to swing back and forth even after it came to a stop.

If perhaps it wore an expression as ridiculous as its form, she could laugh at it and dismiss it as joke. But of course there was only a sorrowful gaze offered over the top of the envelope it carried. Gingerly- hesitant to touch it- she tugged the letter free from its mouth before quickly stepping back to the other side of the road. Heaving what sounded like a deeply depressed sigh in miniature, the little thing rocked and swayed itself around and somehow managed to stumble back into the bushes.

Sunday, January 4, 2009

Project : Mr. Muggles

Project : Mr. Muggles
Date : July 2008 - September 2008
Materials : Yarn (3 types), fabric (2 types), beads, wire, chain, foam, stuffing, tiny buttons, thread, glue
Tools : crochet hook, pliers, scissors, cat brush, needled, hot glue gun
Finished Product:

MrMugglesLeanMrMugglesPofile
Mr. Muggles : done


Process:
MrMuggles1MrMuggles3MrMuggles2


First panic because there's a set of restrictions applied to the project that you must meet (see below). Then just sorta start crocheting and see how you feel. Start at the neck and work down the body, putting a hunch in for shoulder blades. When done, go back and work from the neck up, including a bulge at the back so a stocking hat that you're never actually going to make can be worn.

Avoid finishing/fleshing out the face because you're afraid and go back to work on the body. Half-assedly stick some wire through the body where the limbs are but since you didn't wire a spine, it doesn't really do all that much. Crochet some limbs! But not all of them at once, because that would be commitment. Skip around between legs, stopping at the knees. Add a super stubby fox tail with a white tip. Then start brushing the body with a cat brush because you're too eager to try it out rather then waiting like a sane person. However, realize that this look is not actually a good one and stop before you destroy the entire piece. The end of the project will have brushed haunches, rump, and tail to cover for your failed experiment.

Suck it up because you have to and go back and finish the 4 limbs you got. Use black instead of red because you still have foxes on the brain. For this same reason & the beard requirement, use white for the lower jaw of the face. Crochet basically a bent O several rows deep around the mouth, then cut fabric to shape and sew it in. Bend a wire in place on the "inside" and sew that down as well. Now pull out the red and finish off the head. Be sure to build up around the brow region with sharp increases/decreases and doubling back for shape.

Because the requirements call for it, go back and stick more wire through the body where it looks like you can, and crochet another pair of arms. Then select the most adorable little black matte beads and use them for eyes. I confess to not remembering how I did the nose....

At this point embrace the fact that your 3rd pair of limbs looks terrible, especially where they join the body. Therefore draft a vest pattern and sew it together to hide this yarn connection. Don't sew it directly to the monster itself, but feel free to sew the arm holes and hem it while the toy is wearing it so that you need only make it look good while worn. Also, don't worry about arm hole size, the vest is never coming off you decide because you sew the vest flaps closed when affixing adorable little buttons to close it.

Realize you still have hat + glasses + beard requirements. Shred some nice white yarn to get those wool chunks that make it. Use a yarn needle and thread them through the chin and hope no one pulls too hard on them. Bend that wire you used for armature into the shape of eyeglasses and then solder the bends together to make it stronger/not look as tacky. Leave a wire protruding on one side so you can shove it into the nose and have it stay. Because the monster is beginning to look posh and because the glasses easily fall out, take a segment of necklace chain and solder it to the glasses and sew the end to the vest. Then use foam to make a top hat- a rectangle, circle, and doughnut shape being cut out and hot-glued together to do so. Now stop before you ruin it.

Thoughts :
Mr. Muggles originally started out from a list of requirements, put forward during a Ravelry exchange. The list : “Head: Beard, Long Pointy Nose,Open Mouth, Extremities: Big Ol Feet, Extra Arms/fingers, Body : Scales, Extra Bits and pieces: Hat, Glasses”. "Ugh!" I thought. What a terrible list to work from. The beard, hat, and glasses made it far too human for what I normally like to do. For some reason I was positively gripped with the notion of a fox early on. I also desperately wanted to apply the "brushing yarn" technique I had heard about. There were a number of sketches done for him, before and during the process of his creation. For the longest time he looked older and wiser- a longer beard, simple un-chained classes perched at the tip of his nose, and a stocking knit sock cap with a bell on the end. Phfff... How quickly things can change when I'm actually crafting something.

The clothing improved him greatly, helped define the body. The brushing of the red failed because the red was too solid and the creature lost form. Sad. The hat idea I had gotten from a friend's gift. I'm only mildly sad that I forgot the "big feet" requirement. The open & wired mouth was positively awesome. Fun and very expressive.

In the end, I love how nervous and stuffy he strikes me as.

Mr. Muggles fidgeted with his glasses as he lifted the saucer and took a tip of tea from a delicate china cup. This whole situation was quite distressing and it appeared that, after his fifth cup, simply sipping tea and hoping would not make it disappear. The velvet that the mechanism had lain in was still indented with it's shape- the glass shards of the display case simply dusting the fabric hills and valleys without disturbing them.

It was gone and he, the curator, had no idea where it had gotten off to. All the devices on display weren't wound- he shuttered to think of what level of chaos would be obtained if even a crank or two were applied to some of the artifacts. If the device certainly hadn't made off on it's own, then what? None of the others had been touched. Why just this one? Muggles lifted his cup again but found it to be empty. Sighing heavily, he set it down on a nearby, intact case and hunched down to think. His fuzzy black paws fidgeted with the phantom archival tag he could already imagine tied about his leg. Oh heavens above, she was going to send him away! He looked around, forlorn. He needed another cup of tea.

Project : Caterpillar Mermaid

Project : Caterpillar Mermaid
Date : August 2008
Materials : Yarn (3 types), wire, stuffing, fabric, thread, pins
Tools : Crochet hook, pliers, sewing machine, needle, scissors
Finished Product:
FuzzySnake2 FuzzySnake3


Process:
FuzzySnake_inProgress2

I'm pretty sure I started this ages upon ages ago. And by started, I mean crocheted a basic torso with a tiny V of off-white yarn on the breast. Half crocheted a torso. And put it away for a very long time. Well, along comes August and I pull it out and decide it's too tiny to put your normal limbs on. So I extend it down and down and down further into a snake like shape. Towards the end I give it a couple ring-tail bands of white-white yarn to spice it up. I got back to the top and crochet up a neck/back of the head. At this time, I've also shoved a long wire through the torso.

The scale at this point is rather small and a crocheted face will lack all detail so I switch to fabric. It wasn't meant to be so stubby, it just sort of worked out that way- made of three pieces : the brow, the "butteryfly" muzzle shape, and a tiny wedge underneath for a throat. A two wires are shoved through the torso for arms. That's two wires for four hands. The length of the arm has a basic tube of fabric tightly sewn down it which overlaps the fingers, which for one hand had wire running through them and the second were just folded fabric.

A final pair of legs are half sewn by hand and half with the machine. A wire is stuck through the torso and the legs attached to it. The toes are wired. To finish it off, two black-headed pins are stuck into the face for eyes.

Thoughts :
Pre-final legs, the monster looked really cool. And if I had spent more time on the hind legs, it still might have been cool (remember! Always sew the joints you want! Don't just depend on wires alone for shaping!). The time was not taken, however, since it was a gift to my parents and I was right up against the deadline. The wiring was included so that it could be posable throughout their cubes. They liked it. My mother however considers the pins to be nostrils rather then eyes. Interesting. The degree of pose-ability with this thing is lots of fun, I really wish I had had the time to make a stop-motion clip with it.

There is a woman who I speak to when I go to the drawing group Dr. Sketchy's. We admire each other's work and chat, me somewhat shyly and her with the obligatory crazy-artist zest. During these periods, I often pull out whatever my current in-progress craft project is and crochet in the long pauses when the models take breaks. Being nice and polite, she comments on them and some times makes observations on what they look like in their unfinished state. This one she observed minus the hind legs and declared it to be a Caterpillar Mermaid! I like it.

Project : Bat-Bunny-Dragon

Project : Bat-Bunny-Dragon
Date : January 2008 - July 2008?
Materials : fabric (satin black, furry black, red satin), yarn, foam, stuffing, beads (teeth & eyes), black electrical tape, wire, white out, thread
Tools : sewing machine, crochet hook, needle, scissors, pliars

Finished Product:
BunnyBatDragon


Process:
Bat Dragon

Make a basic wire-frame body for the torso and wings. Randomly cut out scraps of fuzzy black fabric and sew together the torso. Tape up the "fingers" of the wings with black electrical tape. Cut satiny black fabric to size and sew to/around the electrical tape. Leave enough on the bottom of the wings to fold over and sew. Paint a white line of white-out along the edge of the wings (where the fabric is doubled). Cut a thin strip of fuzzy fabric and sew along the "arm" of the wings.

Crochet a "tube" using fuzzy black yarn for the neck. Add more wire to the armature to make up the head and neck. Slip fuzzy neck over it and sew to torso. Crochet a couple final touches onto other end of neck. Randomly cut & sew up a narrow lower jaw with red fabric for inside the mouth. Randomly sew up the top of the head. Think long narrow triangles for the whole thing. Affix both to the neck and each other (can't remember the order) and slip some wire into them at the same time. Cut out some foam ears, attach to head with slight curve. Add eyes. Use a bunch of tiny triangular beads and sew along lip-line for teeth.

Switch to the other end. Add more wire, cut a big triangle of fuzzy black fabric, fold in half, sew to butt, then sew up seam around wire, stuffing as you go. At the very tip, just tie down some white stuffing for a POOF! tail. Switch back to legs and FREAK OUT. Then give up and sew two tiny tubes and affix them to the legs. At this point, call it quits.

Thoughts :
This went from having amazing potential, to being meh, to sucking, to settling on meh. The in-progress photo is my favorite. The head was neat, but I didn't scale it right and so it threw off the whole project. But the time I got to the feet, I just gave up because nothing would fit with the totally wacky scale I had going. Oh, by the way, there was a near six month gap between the awesome stage and the "I screwed this up" stage... But I've reached the point where a stupid finished project is better then a potentially-awesome unfinished one.

The original design was based on this character created by a friend. The wings were awesome for it, and the scruffy neck... but when I stuck the head on there it was, like, 100 times too large and threw off the entire project. The wings look awesome, but are time consuming to make so that's why I ditched on the original tail design as well.

I've come away from the project with a good wing design/approach, a finished project, and a so-so monster that I can hang in interesting places using it's wired tail. Also learned- I can come back to projects and should! Because as lame as they look, they still look better then something with protruding wires that only I can "see".

The creature wobbled forward a couple steps and then two to the left. It shook it's head and chirped. Leaning back on her chair, the woman took the pins from between her lips and handed them to a plump sewing assistant. Sticking them into it's back, it waddled off to the corner of the desk and hunched down. The new creation cheeped and stuck out it's luxuriously maned neck- it's large head bobbing and swaying as it watched the sewing assistant. A long and crooked tail thumped the desktop twice but the woman picked the creature up just as it tried to spring forward.

Her long fingers closed about it's torso, holding it's wings against its body while stubby little feat kicked frantically below. The friendly bird sounds were replaced by a low growl and hiss before it's jaws locked onto her thumb, worrying at the flesh with its nubby little teeth.

"Perhaps I can use it as a decoy," the woman said with a sigh. "It seems noisy enough, and I must have miss read my measurements at some point because at this scale those wings will do nothing but drag." Shaking her head, she tossed the poor thing over her shoulder and went in search for the miss-placed decimal point somewhere in her calculations. Warbling deep in it's throat, the creature picked itself up off the floor and waddled forward to mingle with the other things shuffling about the laboratory.

Sunday, April 20, 2008

Squeaky Toy Monster

Project : Squeaky Toy Monster
Date : September 07 - October 07
Materials : Squeaky toy, yarn (2 types), buttons, fabric, thread, stuffing
Tools : Sewing machine, needle, crochet hook
Finished Product:
Squeaky... thing...


Process:
Ugly Squeaky

Take a squeaky toy- this one having been bought spur of the moment like at a checkout stand for $2. Crochet around it. In my case, mine was spherical and spiky. I noticed the spikes were sticking through the shaggier yarn so I switched half way through. Go back and start making a head. Switch halfway through to the limbs. In this case (and in general good practice) it's always good to do 1/2 to 3/4ths of the legs on all of them or at least a a pair on each before you finish them. I used a curve of black for hooves since I believe I was running out of yarn. After a long delay, I came back to it and not wanting to crochet more since it would muddy the look of the thing, I sewed a simple beak and attached it along with 2 (different sized) button eyes. Fin.

Thoughts :
Totally random project. I was visiting Seattle and came ill-prepared for the planned craft day. Grabbed the toy and yarn day of and did most of the base and some of the limbs in one sitting. I really like the curve of the hind legs and the hooves son all of them. The beak was the result of laziness but still looks good. It did take multiple sittings and there was a *massive* delay in the middle, but I'm still going to list it as "time: quick" since it was light speed compared to my normal crochet projects
Do not ask me what it is. It is made of yarn- do you know of any creatures made of yarn? No, I didn't think so. So why should it be confined to 'being' some creature of flesh and blood that you are already familiar with? It is like a gargoyl, made from an unliving substance, suggestive of many different creatures and yet very firmly of it's on kind. And like a gargole, it perches upon my castle walls and watches over me, protecting.

Of course, when I say "perches" I mean barely balances and my castle walls are rather short and defining a very personal eight by eight plot of office space. The only protection it offers notification of incoming attack with a loud squeak since my cube-mate, when arriving or leaving, can not seem to avoid squeezing it and, if I'm unlucky, chucking it blindly at me over the wall.

Wednesday, March 12, 2008

Project : Skull Bear

Project : Skull Bear
Date : January 2008
Materials : Wire, tin foil, clay, white out, hot-glue, a pinch of fabric, yarn (2 types), thread, beads (temporarily)
Tools : Crochet hook, needle, hot glue gun, oven
Finished Product:
Skull Bear FinalSkull Bear Final


Process:
Skull Bear : rough finishSkull MonsterSkull Bear : rough finish

Given that I'm a poor sculptor, I started with the head. Looking back, I would have started with the body- as I do with almost all my projects- and *then* done the head. Sigh. Live and learn. Anyway, I bent some wire and used some tinfoil and then some clay and BAM, I made a skull. Of course I was desperately looking at photos while I did this and it still sucked. There's a skull top and seperate jaw, mind you. Baked them, then painted 'em with white-out. Started crocheting the bear. Had massive, massive, *massive* problems sculpting it correctly. Left a gap at the bottom and also inserted a wire spine. Got glued a scrap of fabric to the clay bits and then sewed that to the yarn. Had difficulties sewing it such that the two would line up. Then I crocheted the limbs. Put very stupid looking beads on as claws, closed up the rump and called it good. Went away for a while, then came back to it. Sculpted clay claws and then went over the chest with some re-shaping crochet and added an (ugly) tail. During this all one of the teeth broke off but was easily hot glued back on and then repainted with whiteout. Several paint touch-ups were needed throughout but luckily whiteout is easy to find, use, and dries fast (the reasons I picked it)

Thoughts :
Good first try. Interesting idea I will have to try again. Skulls are a bitch though- hard to draw, hard to sculpt. Toy was made upon request for Moonykins for the Ohantra character. You can see I was less successful adapting this one- moved it from an on-all-fours character to a more doll-like form. Also the shaping around the jawline failed despite my best efforts. Really, I blame working head-first for most these problems. It's actually really fun to play with. I like making the mouth open and close to sing along with whatever I'm listening to. The sculpted claws are also quite awesome- the hands are individual claws while the toes are fixed in a row.

Project : Mook-Mook

Project : Mook-Mook
Date : February 2008
Materials : Yarn (2 colors), wire, stuffing, embroidery floss (black), fabric, thread, beads
Tools : crochet hook, needle, sissors
Finished Product:
Mook-Mook1Mook-Mook3Mook-Mook2


Process:
MookMook : Early Stage

With the crochet monsters there is both a technique and a wild attack that goes beyond words. Some day, I'll write up the technique...
I started at the throat and crocheted down. Giving a monster a "tummy" may make it look better, but switching back and forth between the yarns as you makes for a less fluid flow. The mid-section has only a minor bulge relative to the thickness of the neck. Went from the neck and crocheted up one throat, then back to the neck and up a throat and most of a head. I switched back to the first head, finished that, and then finished the second head. Then the hind legs were added, the bottoms staying open. A two pieces of pipe-cleaner were stuck through the body and then crocheted (tightly) over on both sides to create the front arms. Little circles of fabric were cut and then sewn to the bottom of the feet. Some stuffing was affixed to the rump- I can't remember if it was pulled through with a hook or needle or flat out needle felted on. The ears were added- nubs of crochet with a tiny triangle of fabric sewn on the back. Eyes were added and then little triangle noses sewn on with floss. Somewhere in there I went back and crocheted over the chest a bit to correct the shaping.

Thoughts :
I don't know where the name Mook-mook came from, but it struck me day one and stuck. He was created for a Ravelry craft exchange based on someone else's sketch and I'm very, very sorry to see him go. I'm fond of the girl he went to though and I got a *fantastic* creature in return so I don't regret doing so... but still there's sadness. This is the first of my monsters that both the Greatest Living Philosopher and I like.
Despite looking so cute at the end, he went through some rough times. At a Dr. Sketchy's session, the lady next to me said it looked like a penis wishbone mid-way through. And when I was picking up eyes, my friend claimed to be highly skeptical of how it would look... although seeing the final product I know that the eyes are the key to the "cute" look. Relatively easy to make... the rabbit tail idea was random and I should do pipe-cleaner arms like that more often. Last thing to note is the tag. I saw many tags like this at the Swedish Natural History museum, hanging from the legs of long dead creatures, some times typed, sometimes handwritten. I feel they bring a sort of credible, sophisticated look to the creatures that I strive for. This one was lovingly made and I feel really adds to the look. (The tag was nabbed from work... I NEED to find where it comes from so I can buy handfuls of them)
The tag reads:
    Mook-Mook
   Mookion mookus (in italics)
   First seen by Pam M
   Caputred by Rebecca
   Winter 2007-2008 (in italics)