Showing posts with label time: quick. Show all posts

Saturday, May 29, 2010

Glass Wall Critter

Project : Glass Wall Critter
Date : Summer/Fall? 2009
Materials : bottle-cap, wire, suction cups, a bell, fabric (2 types), embroidery floss
Tools : pliers, scissors, needle, hand powered drill
Finished Product:


Process:
Bottle cap monsters are pretty easy. You take a bottle cap, you put fabric around it. Done. Thine one has only one real modification--
Before you start any fabric stuff, get a drill (or nail and hammer might work?) and poke 2 holds in the bottle cap edge. These are the leg holes so they should be sorta' on the same side, close but not too close. Hip-width. Then, string wire through the wholes. It helps if you have twisted double wire, maybe run a wire up one leg, across the outside of the bottle edge, and down the other. Things like this will help prevent the legs from swinging too much. You want the legs to project out from the edge, not to lay flat against the edge. Laying tape down or hot-gluing the wire that runs between the leg holes might help (I can't remember if I did or not).

Make sure the leg wire has an extra length at the end. Suction cups usually come with hooks- wiggle those off and then wrap the wire around the nub. This should be a secure anchor.

Now cut the fabric. There are few pieces and they're easy to measure by placing a (fresh, different) bottle cap on paper and tracing it.
Fabric 1 :
A circle for the rump. The circumference of the edge split into 2 pieces of "inside" the legs and "outside the legs". Remember that the edges need extra fabric to fold over. Cut strips of fabric long enough to cover the wire legs. Be sure to flare at the end to cover the suction cup nub on top.

Fabric 2 :
Cut a triangle whole's base is the length of the "outside the legs" circumference. Then cut a tiny wedge whose length is the "inside". Those two are the top & bottom of the head.

Sew the leg fabric over the suction cups and up the leg. Sew the "outside the legs" fabric to the rump and then to the legs themselves. Then do the "inside the legs" strip. Now hopefully you have somewhere inside you can anchor an extra length of wire to (the wire between the leg holes?). Cut a single wire line that will exceed the length of the head. This is the antenna. Sew the head fabric on but leave the "nose" open a bit, where the antenna wire pokes out from. We're going to wrap the antenna wire with embroidery floss (keep it at 6 strands for thickness). The way to do this is....

I probably need a picture for this. I'm sure there's a name for it. Make a series of loops/twists. As you go, you'll realize that each loop/twist leaves a "bump" This is fine. The loop/twist... it's... you twist the loop, put the antenna wire in the middle, and then pull the tail of the thread up through the middle of the loop. Enough of these, made close enough together, is how you cover the wire. Remember to put a bell at the end of the antenna (before you cover it). Now close the nose. Done!

Thoughts : Very cute, very easy monster. This has to be one of the worst written Process sections on my blog so far though.... Sturdy wire legs and the suction cups make it easy to place and post. The bell is cute and the little ring of the bell makes it playful. A fun toy to have on the desk. Can stand easily on the ground due to the cups as it can on windows. The nose could sometimes hold a pencil/pen, but not very sturdy like. At Christmas I had it hold a candy cane so I guess it's not that weak.

Despite such a crummy Process section, this is one of the projects I actually recommend someone tries. Not that anyone reading this is very interested in making the projects I detail (who the hell is reading this anyway?) but if one were to attempt a project this has a good rewarding to easy-to-make ratio.

All the office peons were trapped behind glass. What was it there for, no one knew. It was large enough to act like a wall but served none- and we do mean none of a wall's purposes. We weren't to lean on it. We weren't to hang stuff from it. We weren't to write on it. It didn't block sight or sound. It was simply this.... obstruction. A symbol of the cages we were trapped in.

Which is why I made a creature to perch so clearly upon the wall. A little bell to ring to make sure you saw it there. A single antenna to extend, like a slender middle finger, and say "Fuck You" with.

Thursday, May 27, 2010

Light-Bulb Raptor

Project : Light Bulb Raptor
Date : Fall 2009?
Materials : 1 lightbulb, melted red crayon, fabric (2 major, 2 minor), thread, yarn, wire, chain, stuffing, 4 beads
Tools : pliers, hammer, needle, scissors
Finished Product:

Process:
Part 1 : Lightbulb.
So you take a lightbulb. Then you get a hammer and you smack it a couple times. No, not on the glass part. What you're doing is trying to chip the very bottom of the lightbulb where it screws into the socket- see, that part is glass down there too. You've got to chip the very sturdy & solid glass at the bottom of the bulb enough for you to get in there with pliers and finish the job. Knock out all the glass at the bottom, reach in and pull out the inner parts with pliers, and then clean out the inside. I don't know, but I assume that the white coating is bad for you. I assume the whole thing is bad for you. I tend to use a damp paper towel. Eventually I need to rince it with water, but I leave the used water out to evaporate and toss whatever it dried up in away (rather then dump it down the sink. Cracking and cleaning out lightbulbs is fun and mildly therapeutic, in my opinion. I often will empty a light bulb (once it's dead) for the fun of it, even if I don't have a project in mind.

Part 2 : Crayons.
I used melted crayon wax (red of course) to cover the raw end of the bulb, where I opened it. If you are only going to melt crayons once or twice (who could possibly stop at that??) then make little meth-head like spoons out of wire and tinfoil to hold the melted crayon over a candle with. If you're going to do it more (and you shooooould), invest in a basic metal ladle- I got a pair at a cooking store and have been exceptionally happy with my purchase. I also have one of those magnifying-glass/gator clip assistans that will hold the ladle over the candle for me. How cool is that? Anyway, I poored tiny bits of crayon in at a time and spun the bulb. As you can see, a couple drops slipped down but I'm happy more didn't spill. Less is more.

Part 3 : Fabric.
So I had this awesome bulb that looked mildly bloody. I sewed a tight fabric sleeve around it in red from which to build on. Realizing that making it the mouth/opening into some creature would just look too inappropriate, I drape a creature over it. First just the curved back in blue, with two blue extensions hanging down for legs eventually. Then a blue extension for the top of the snout. Then two slivers of white for the lips. Then a long white strip for under the throat. Now it's time to sew and wire the mouth. I can't remember if I sewed the wire down to the body fabric or to the red mouth fabric first. Always attach the wire to the fabric directly! Then I attached the fabric to the fabric. The head is done.

Cut white fabric for the inner thigh and sew up. As you're doing so, run a wire through and leave the "ends" of the thigh loose- we'll close them after we do the chicken legs. For the legs, take basic strips of gold fabric and twist them around the leg. Then take a thick strand of yarn and do a sparse twist around the leg. Then use pale tan (and hopefully mildly invisible) sewing thread (not embroidery floss!) to hold it all in place. Once the legs are done, go back and close up the thigh-- you should be able to tuck the ragged end of the chicken legs under the thigh fabric for a cleaner close. Add a pair of black beads for claws (I didn't have enough for the hind fingers sadly)

Now consider the tail. Note that even now with the very posable legs the creature can't actually stand. It's unbalanced unsurprisingly! So find a nice length of weighty chain. Simple rocks/rice stuffing wont work because it'll puddle incorrectly. The chain is a heavy weight all the way down. Hook that to the body (attaching to the wire in the legs for a good anchor), wrap with stuffing, and then cut fabric to cover it. Sew it all down and you're done.

Thoughts :
Cute! Super cute! I don't know why, but it's cute despite having a gaping wound as if a lightbulb had been shoved into it's gut. This took a comparatively quick time to make. One evening to gut the bulb and coat it. And then two evenings worth of work for the sewing (I think... this was a while ago....). I received several comments from the people at work about it- it's one of the most popular pieces so far. The tight fitting of the head/jaw wire really helps I think. The wide mouth is also intriguing- I often try for a "wedge" shaped head but so rarely succeed like I did here.

So the tail twists... so what. That's what happens when you pull your fabric to line up rather then cutting the patterns correctly in the first place.

At work I in theory used it to store a single pen. The bulb opening was too narrow for more then one pen/pencil... the mouth could hold one as well.... overall, far more good looking then it is practical.
A co-worker's young son was quite taken by the beast-y. The father even inquired the next day at work as to how one could make it. Imagine that! A young lad not normally given to the 'feminine' arts was so inspired by my critter he actually wanted to learn to sew so he too could make one! Thrilling! What better compliment is there?

Alas, while paper was cut before fabric there was no way to transmit the 'pattern'. How can you explain something that was constructed via a feeling and tugging of fabric? This is one of the most non-replicable creatures I've made due to the melding of bulb and fabric and wire. And so I wrung my hands and made vague mutterings and provided nothing useful. Typical. An excellent opportunity lost.

Sunday, May 3, 2009

Project : Casting with Crayons

Project : Casting with Crayons
Date : April 2009
Materials : Crayons!, Tap silicone RTV A & B (blue), lots of paper towers, tape, super glue, hot glue, poster board, clay, things that I wanted to cast
Tools : Saw, glue gun, candle, lighter, aluminum can, stir stick, disposable measuring cups
Finished Product:
Casting results


Process:
Second Mold setup

Part A : Make the mold
To make the mold I cut out the box pieces from poster board and hot glued them together. I then just stuck things where they would fit- using two methods of attachment. A: clay! just stick it to the wall and stick the item into the clay. The end. B: Tape and glue! If I had double sided tape, this would be way easier... but I didn't... so I glued the non-sticky side down and stuck gears to the sticky side. After I was set, I mixed up the silicone mold as described on the side of the bottles. It's a mess, I wont detail the steps, they're already written down on the product. But *so* messy. Note: I used un-baked clay and it greatly slowed down the drying of mold touching it. The tape did as well, I believe.

Part B : Cast with crayons
Take your average soup can and wash it out & dry it. Throw some crayons in it. Light a candle. You can hold (with your fingers! How neat!) the can over the flame and melt the candles. Careful- the can get warm if your holding it near where you're warming it... experiment, you'll figure it out quick. Pour into molds! Tada! It dries super-quick for the shallow molds but deeper ones of course take longer- I just threw it in the fridge to speed up cooling down. I found that if I pour a bit, pushed it down with a stick and poured some more there was no structure issues and it filled the mold out more (for the gear teeth).

Thoughts :
Tape method works really well but still having difficulties... how now to prevent/remove the excess/overflow on top of the mold? Hmmm.. For things like the screw, rocking the screw back and forth a bit in the clay pre-pouring to allow the mold to inch up & around a bit more helped. The varied speeds of drying freaked me out, but now I know! The hand mold is difficult to remove, but none other are...

They're cool, but I'm not sure what to do with them... re-melting the gears is a pleasure to watch. Haven't tried to draw with them yet, so I don't know how sturdy they are. They respond well to modification via a heated needle after they've dried.
My current goal is to eat a computational machine. A thing that does something- I want to eat it. Consume it entirely. Ever seen the movie Ravenous? Sort of like that... I've given a lot of thought about how to consume circuitry, but I don't see how it'd work... so now I'm settling on a mechanical device... my goal to to better my skills with casting so I can buy food-safe silicone and create wonders... movable, edible, yummie wonders.... some day...

Wednesday, April 1, 2009

Foo Man Choo-Chew Bear

Project : Foo Man Choo-Chew Bear
Date : March 2009
Materials : Yarn (3 types), fabric (2 types), wool (2 types), some wire, 2 beads, thread, stuffing, a battery, part of an old t-shirt, some tiny glass stones, a cat toy, stuffing
Tools : Crochet hooks, needle, pliers, sissors, needle felting needle
Finished Product:
Foo Man Choo-Chew BearFoo Man Choo-Chew Bear


Process:
Upon acquiring a neat skein of yarn, just start working on making something- anything. You can never go wrong with a fist-sized round-ish shape (a kidney shape would be better, but in this case the yarn was just too crazy/bitchy to take much shaping). Later, when you realize you've crocheted a lump, try to jazz it up by sticking a spherical rattly cat toy inside it. Hey, now it's a lump that rattles when you shake it! Make sure you line the inside of the creature with some fabric (old t-shirt) so that the stuffing doesn't ooze out. Oh, add some stuffing. Leave the bottom open for last-minute modifications later.

Switch to a softer, easier to use yarn and crochet up a stump of a head. When you get to the jaw level (top of the jaw), stop and sew down a mouth. Do this by folding some cardboard in half, trimming it to the right shape, taping tiny magnets to either side of it (the "outside" of the folded cardboard), covering it with red fabric, then sewing half of it down onto the yarn jaw. The magnets should cause the mouth to snap closed. When resuming crocheting, rather then grabbing the stitches the mouth is sewn to, make a chain as long as the circumstance of the mouth and work from that. Continue crocheting up and around. When you get half-way up the head, sew the upper-jaw yarn to the top half of the folded mouth. Now go back and finish the head (stuffing the whole time as you go).

Aim to make some stubby legs. Do a tiny pair on the front (in the end, they'll be the middle pair). Crochet them with a thick easy yarn- nothing complicated, just a tube. Then do the hind pair- crochet just far enough so that its ass isn't resting on the ground when it stands. Add a battery to the monster's rump to make sure it stays balanced. Close up the tummy.

Finish the legs by stuffing them, adding a couple glass stones/magic counters, then using tiny scraps of fabric to sew the legs closed at the end. Then add the forearms by sticking some wire through and crocheting down it. Make sure to bend the wire into loops at the end and crochet through & around the loops (it still wont prevent the wire from occasionally poking out, but it helps and hides any sharp points)

The main body is done! Now to add flair- select some really bulbus vaguely green beads, sew them to the head. Realize it's kind of hard to pry open the mouth so add a little mustache and goatee to grab onto. Note the vaguly oriental look the facial hair adds and cut & sew some fabric scraps down over the eyes to give it a heavier glaze. Looks more ancient and wise that way. No eyelids = stupid and/or anime looking. Fin.

Thoughts :
Bought the yarn totally randomly on trip to NY. Started crocheting it at a friend's house out there and found it fun (if not really a look I love). Came home and was compelled to finish it asap. I like how simple and carefree it is. The magnet mouth + wire arms makes him great to hold a note and a pen. Good office desk companion. Very random, very quick (for crochet at least).

Before he was given a face, Adam said he looked like an inset bear. The facial hair - added so the mouth was easier to open - was labeled as being foo man choo like. He has a mouth to hold and/or chew things. Thus the name.

It was unclear whether the bulbous shapes populating its back were the results of a terrible disease or merely the artifacts of an untidy hide. The creature's steps were short and far from graceful. Thin arms dangled down from its curving chest and swayed limply before it with every lurching movement. They continued to swing back and forth even after it came to a stop.

If perhaps it wore an expression as ridiculous as its form, she could laugh at it and dismiss it as joke. But of course there was only a sorrowful gaze offered over the top of the envelope it carried. Gingerly- hesitant to touch it- she tugged the letter free from its mouth before quickly stepping back to the other side of the road. Heaving what sounded like a deeply depressed sigh in miniature, the little thing rocked and swayed itself around and somehow managed to stumble back into the bushes.

Wednesday, September 10, 2008

Project : Chewie-kun

Project : Chewie-kun
Date : August-ish 2008
Materials : Brown fake fur, brown simple fabric, red satin-y fabric, two beads, thread, stuffing, 2 batteries, tinfoil
Tools : Sewing machine, scissors, needle
Finished Product:
ChewieKun_hangin ChewieKun

Process:
After sketching out an initial rough idea, which took the Chewbacca character and tried to make it as simple as possible, I just went at it with rough paper patterns and cut into the fabric. As I usually do when working with little fore-thought, I cut most pieces large and simply trimmed & tucked them down as I went to achieve the shapes. Made the torso first, then the head (lower jaw and upper skull being separately constructed pieces). Before connecting fuzzy head together, I sewed the inner mouth down with fancy red fabric. . The limbs were cut and made, bottom first. They have a slight flare as the limbs extend. Sewed a "kink" into the legs where the knees are. I wanted him to have more weight and hang better, so I stuffed the bottom of his feet with old batteries. I can't remember if I put them in the feet alone, or all four limbs. Used the basic brown fabric to make little circle caps at the end of the limbs. Added eyes. He didn't quite scream Chewbacca enough so I went and sewed a little sash, put a pouch at the end, and then folded tinfoil and sewed straps down for it. The end.

Thoughts : Gave it to my ex-co-worker and good friend Darren, who seemed to like it. That's good. The quality of craftsmanship was kinda' iffy... the fur hid my stitches while preventing me from making strong ones... The batteries in the feet added an adorable weight to it- making them swing back and forth just so- and seemed like a great use of dead batteries. I am holding onto all future dead batteries for such a purpose. Does anyone know if this can cause a problem somehow? The tinfoil "amo" was very tacky, but the belt was nice. Put a coin in the pouch, adding a nice weight. Given how quickly it was made, and how hard it is to mach Chewbacca fur specs from your average craft stash... it all turned out as a lame "okay".

He shuffled forward, long arms swinging back and forth and the fur around his feet rapidly accumulating a thick coating of dust bunnies. He could feel them dragging him down slowly, the Will of this space wishing him to stop and stay. The back of the couch towered above him, allowing only a thin sliver of living room light to tickle down. Ahead he could see the crumpled form half standing- propped up by wall and couch.

Something made a scuttling sound under the couch and Chewie-kun made a low moaning sound in fear. At the noise, Han Solo's stubby arm jerked and tried to wave. He wasn't as well stuffed as the fuzzier toy and the therefor was not able to right himself on his own. Han had only fallen behind the couch yesterday but already a heavy layer of cobwebs and dust had settled on him. A little fabric leg was bent and hidden entirely by the couch as if something had tried to pull him under.

With a growing roar, Chewie-kun shuffled faster for the last couple steps and charged full force- or as forceful as a toy can- into Han. There really was no better way to do it- when you've no hands but just fumble-y appendages, pushing and pulling in close quarters becomes hard. Both carried forward half a foot or so before landing in a pile. With his head lower, Chewie-kun could see something metallic glint in the dark under of the couch.

"WUUUURRrrrrrrr!" Chewie shouted, sweeping a limb back and forth to fend off the threat. Han had managed to squiggle over him and was limping and flopping toward the other end of the couch. Kicking and swinging his limbs, Chewie-kun continued, trying to follow. They *had* to get out now, or risk being trapped here forever- forgotten and molding!

Sunday, April 20, 2008

Squeaky Toy Monster

Project : Squeaky Toy Monster
Date : September 07 - October 07
Materials : Squeaky toy, yarn (2 types), buttons, fabric, thread, stuffing
Tools : Sewing machine, needle, crochet hook
Finished Product:
Squeaky... thing...


Process:
Ugly Squeaky

Take a squeaky toy- this one having been bought spur of the moment like at a checkout stand for $2. Crochet around it. In my case, mine was spherical and spiky. I noticed the spikes were sticking through the shaggier yarn so I switched half way through. Go back and start making a head. Switch halfway through to the limbs. In this case (and in general good practice) it's always good to do 1/2 to 3/4ths of the legs on all of them or at least a a pair on each before you finish them. I used a curve of black for hooves since I believe I was running out of yarn. After a long delay, I came back to it and not wanting to crochet more since it would muddy the look of the thing, I sewed a simple beak and attached it along with 2 (different sized) button eyes. Fin.

Thoughts :
Totally random project. I was visiting Seattle and came ill-prepared for the planned craft day. Grabbed the toy and yarn day of and did most of the base and some of the limbs in one sitting. I really like the curve of the hind legs and the hooves son all of them. The beak was the result of laziness but still looks good. It did take multiple sittings and there was a *massive* delay in the middle, but I'm still going to list it as "time: quick" since it was light speed compared to my normal crochet projects
Do not ask me what it is. It is made of yarn- do you know of any creatures made of yarn? No, I didn't think so. So why should it be confined to 'being' some creature of flesh and blood that you are already familiar with? It is like a gargoyl, made from an unliving substance, suggestive of many different creatures and yet very firmly of it's on kind. And like a gargole, it perches upon my castle walls and watches over me, protecting.

Of course, when I say "perches" I mean barely balances and my castle walls are rather short and defining a very personal eight by eight plot of office space. The only protection it offers notification of incoming attack with a loud squeak since my cube-mate, when arriving or leaving, can not seem to avoid squeezing it and, if I'm unlucky, chucking it blindly at me over the wall.

Monday, September 3, 2007

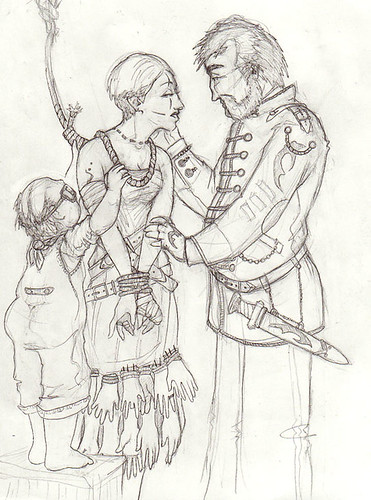
Image : Hand Skirt

Project : Hand Skirt
Date : September 16th, 2007
Media : Pencil sketch gone over with a 0.03 pen

Image:
HandSkirt


Thoughts :
I did this while stuck on a flight from San Fran to Germany for work. Started with just the woman's face, then the midget because I couldn't bring myself to erase some of the hands, and then... I don't know. It went from there and a very clear story unfolded in my mind mid-way through the sketch. The rest of the image was like playing a game- illustrating tidbits I thought of and trying to rationalize things I illustrated. In the end, I'm very fond of it. I also found that such things make me a good candidate for long flights since the trip and seat confinement bothered me not one bit as long as I could sketch.
I currently have it hanging on my cube wall despite several disparaging comments against it by a coworker who seems to especially dislike it of all my pieces. Screw him- looking at it pleases me.
I would be highly inclined to trade artistic favors if anyone managed to write a short (or longer!) story based off this image...
He reached up to caress her face and was met with a heavily lidded gaze filled with cold disgust. It broke his heart that his faith angered her so- he had tried so hard the bloody night before to explain it to as they purified her for this dawn. How could she not see that this sacrifice was the highest sign of his love. To lose her hurt him more then the hangman's noose could ever inflict upon her.

He felt no anger at her for the enchantment cast upon him as he and his men had ridden up to the cottage. In fact, it rather pleased him to know that this unnatural adoration she inflicted upon his heart would be useful upon his eventual return to court. No saucy Duchess or sultry Baron's daughter could ever manage to cloud his reason with worldly wants now. His heart was forever bound to his witch, he knew this. But in order to ensure their eternal bliss he had to do this. Those fingers and flesh distorted from a lifetime of dealing with the Dark Arts had been lovingly parred from her by his very own hand. He was strong enough think ahead- to lose her in this life time was worth their eternity together.

Besides, she was a witch and had long since lost the fear of death. It was not the noose, but rather her failed attempt to enslave him that made her so recalcitrant this morning. The least he could do was let her wear her bloody skirt, sewn from the hands of her victims, on this, her last day.

Saturday, September 1, 2007

Project : Egg Shell Monsters

Project : Egg Shell Monsters
Date : Mid to end of September 2007
Materials : Egg shells, clay, solder, pins, copper tape, flux, hot glue
Tools : Soldering iron, hot glue gun, pliars, oven
Finished Product:


Process:
So you make some hard boiled eggs. Then you eat them. Best instructional steps ever, yes? Just be careful when you shell them- I used an exacto knife on one to pre-crack around the center. I found trying to salvage only one side of the shell per egg was best- the big endians working better. Let them sit for a day or two to dry and what not.

For the robo-egg, just lay down copper tape around the inside of the shell, prime with solder. Pre-bend the pins so that they poke out from the edge of the shell after a tight u-turn and attach. Then add the next segment of the leg. The end.

Hand-egg used twisted tinfoil as the base for the hands. Sculpt accordingly. I did not glue until after both were done. Be mindful of how the clay will contact the shell. Hot glue into place after legs are baked.

Thoughts :
The legs on robo-egg aren't insectil enough for my tastes. The angles at the joints are too wide, leaving it to sit too low to the ground. I've since picked up T-pins which I may use for another version later. The hand-egg was meant to be a leg-egg but I couldn't sculpt legs. This makes me sad. The hands aren't actually the same size, but it's okay because it looked like overly dramatized perspective. Feature, not a bug. Riiiight....

    Curios, she picked up the little creature as it scuttled past her yet again. With a delicate touch she pinched the shell and lifted it straight off the table, its tiny legs kicking frantically. She turned it upside down in an attempt to examine how the furiously moving legs attached to the shell. Look at it as she might, she felt her eyes unfocus or simply slide to one side or another.

    "Please put him down," the witch said as she returned to the room, carrying the tea tray.

    Sam felt guilty being caught prying and quickly did as the woman asked. Dropping the creature, she chipping the rim of it's shell with her haste. Unphased by the damage, the thing quickly scurried away around a corner as the witch came over and set the tray down.

Friday, August 3, 2007

Project : Steampunk Hair Piece v.2

Project : Steampunk Hair Piece v.2
Date : Aug 20th, 2007 one evening
Materials : Adjustable crescent wrench, wire, philips screwdriver (broken), streach red velvet, hot glue, solder, flux, thread, copper tape
Tools : soldering iron, needle, pliers, hot glue gun
Finished Product:

Process:

Images from v.1, now lost


Ridiculously simple. Cut/break/hack up the handle of the desired screw driver. Solder to end of of the wrench. On the first version, I had to saw off the end of the wrench (which ate up a new blade) and only hot glued. On second version, I cut nothing but had to lay down copper tape onto the wrench handle for the solder to take. Thing wire was twisted about and soldered to for extra stability. A thick layer of hot glue was added for stability but mainly to smooth out the uneven surfaces. Stretch fabric was then wrapped around and sewn into place. Make sure the stretch runs around the girth of the tool.

Version 2.0 is 6" long. The wrench half is 1.5" which is ideal. The center is 2" and does not taper smoothly on the screw driver side which makes it difficult to wear. This could be fixed if I were to cut the fabric off and reshape with more hot glue. The screw driver is 2.5" which is okay, but I could have done with a bit more length.

Thoughts :
These things are very easy to make and very pretty to wear. The screwdriver on the first came in handy several times and I suspect the adjustable wrench wont be neglected. The only complex bit is in fact how to properly twist your hair up to wear it. Perhaps I'll document that next. Version 1 had a better looking tool while Version 2 makes for a better hair piece.
The boys at work always carry around their Lethermans and other fancy tools in their belts or in boxes. Whipping out pliers with a crack or folding up a blade with a snap. I've decided to not be outdone and designed my own tool to be carried around at all times. It makes no loud sounds when brought into use, signaled instead by a cascade of hair falling down my back.
Elegant and functional, I find it to be a key item to display my thoughts on the idea of "steampunk"


UPDATE: While visiting Seattle, end of August, Logan sort of sat on it and the solder joint broke. I now have an excuse to go back and make it better, which I've not complaint to do.

Wednesday, August 1, 2007

Project : Paper-Sewn Pillow

Project : Paper-Sewn Pillow
Date : August 20th, 2007 at dusk
Materials : Thread, fabric, book you can decimate
Tools : Soldering iron, sewing machine, needle, scissors
Finished Product:

Process:

I happen to have been burning pages for another reason, but wherever you get the paper should be fine. The burning of the edges isn't necessarily required, but I think it makes them more interesting then a boring straight cut. But then again, I do love to burn paper for any and all reasons. I cut the pages out of the book by drawing the outline and pressing a wide-tipped soldering iron around the path, burning it one centimeter at a time. Takes time, but the end look is worth while.

Then, sew them together on the machine. I used a wide stitch and nice visible black thread. Be mindful that you can really re-angle the two pages once you start sewing so make sure they're lined up just right. I left the ends as just long threads (no backing up over stitches) and tucked the ends under every time I joined pieces. You'll notice that the paper goes only to two sides, rather then all four. This is because I didn't want to shape it to the pillow's bulge and putting bend on the pages in two directions wouldn't work well.

Then, sew on the edge fabric. Then, sew the back of the pillow on, right sides facing. What I did was just sew the fabric-to-fabric parts. That leaves a whole side un-sewn and gaps where fabric meets paper. Then turn it right-side out. Now pinch the fabric at the fabric-meets-paper seems and use a fancy stitch to sew it close. This doesn't make for a perfect edge, but I figure it's stronger then trying to hand sew it and putting a lot of wiggle strain on the stitches.

I haven't quite figured out how to close the last fabric-to-fabric seem though...

Thoughts :
It looks mighty pretty, though it is severely impractical. The pages mean nothing, alas- they just come from some random stupid book. Using a meaningful book would be fun. Thoughts of laminating or re-enforcing it somehow are now being contemplated.
--image I left at home, will be uploaded by Thur Aug 23--

Wednesday, July 18, 2007

Image : Forced Grin

Title : Forced Grin
Date : July 27th, 2007
Media : Photoshop 7 & Wacom Tablet : Tie pen pressure to both brush size AND opacity for best results

Image:


Thoughts :
Done in 1.5 hours, from complete scratch, entirely on the computer? That's pretty amazing, for me at least. I'm normally wretched with CG sketching. It helped that I had such a fixed image of my head of a stitched on grin... I love the hands, the lace, and the teeth. Nothing but the tears look poor to me. How *does* one illustrate tears? I also don't think I quite captured the extreme distress of the grinner. What an odd feeling it is, as an artist, to try and capture an extreme negative emotion. Do we project an attempt at the mood upon ourselves? Are we inflicting it upon our subject? How can you capture the mood without feeling it in some way.
...Perhaps if I understood biology or psychology better I could explain this fact, but regardless I know it to be true- a mood is brightened by smiling. Your own false or force smile, a received smile, an offered smile. Any and all elevate the mind and the mood. Some may question the inclusion of a false smile but please do not miss-interpret it. I do not mean a sneering upturned corner of the mouth or a sulking twist of the lips offered up to some relative. Instead, replace your default blank expression with a slight curve of the mouth. At the very least, un-furrow that brow. Such strain often offers low level distress and you'll find you cannot keep it so tense and easily grin. ...

Sunday, July 15, 2007

Project : Wooden Bug

Project : Wooden Bug
Date : End of June 2007
Materials : Wood, pins, flux, solder
Tools : Soldering iron, pliers, hammer
Finished Product:

Process:
Find yourself a piece of drift wood that has a lot of character. Add to this character by burning into it patterns and designs with your soldering iron. Hammer a couple of pins into the body, bend them, then solder another set of pins onto the ends of them for segmented legs. A drop of solder on the first bent pin's turn adds to the look of large segmented bug legs. The end.

Thoughts :
It's a good idea, but I just don't know how to burn wood interestingly. The sucker patterns- neither patch of which are pictured here- were the most successful look. I will definitely try more of this, it is a pleasant mixture of nature and metal.

Friday, July 13, 2007

Project : Damaged Messenger

Project : Damaged Messenger
Date : July 12th, 2007
Materials : Type writer parts [most notably the N/n striking bit, levers, and springs], copper tape, copper wire, pins, nails, a screw, drift wood, flux, far too much solder
Tools : Pair of pliers, soldering iron, saw, hammer
Finished Product:


Process:

Yank out all the parts from the machine. I found gripping at the base with the needle-nose pliers and then just agitating it with constant little wiggles eventually broke the metal. Attach the striker to the.... 'tail spring' part. Cut a notch in drift wood and then cut to 'body' length. Line notch and base of wood with copper tape and spend far too long trying to both wedge the tail into place and solder it to the tape. Oh, and be sure not to let the tape fall off the wood. Score the wood with a soldering iron and wrap the base with wire- preferably catching it in the groves you just burnt. If you make a mess like I do, consider hiding it behind a screw which can also work in as a sort of anchor for the wires.

Now consider the hind legs. Wrap a thin strip of copper tape where you want one half of the spring to connect, then solder it down. Try, somehow, to bend them into a fitting position. Wrap the leg's connection point in copper tape and liberally apply solder to the entire thing. Struggle for at least 30 minutes to attach the legs straight to the tail, give up and wrap the wire around them for support. Now you'll find it's super easy to solder them down. Oh, if you really want to do it the Sithel way, be sure to damage your soldering tip somewhere at this stage. Now bend some nails and solder them to the copper tape, this can also help prevent wire wiggling and further anchor down the tail.

If you're not lazy, you might consider permanently attaching the other half of the springs, but I didn't bother. Add flare for personality such as pins for antennae and a stupid burnt gash for a mouth.

Thoughts :
So I found an old, semi-electric typewriter at an recycle store and nabbed it for a reasonable price. The keys are far from pretty, but I found myself drawn to the myriad number of springs and levers in the back, as well as the strikers which are so unique to the machine.

I list this as being quick- about 3 hours total- but I had spent nearly an entire evening previous pulling the machine apart and getting familiar with the pieces. It helped that I sad down the evening of construction with a relatively clear image in my head of what I wanted and how I'd get it from the start.

My original intent was a sort of scorpion feel, it turned out more grasshopper-esque, and photographs like a spider! The pivot for the "tail" is a unique and very fine piece I pulled from... somewhere. It was a fight to overcome the "I must save this till the *perfect* project comes up" feeling in order to actually *make* something. The key is of corse unique, but I'm not overly fond of the letter. The legs came jointed- they connect to the strikers so I've got quite a few left. The springs from below the keys- no shortage of supply there- and are of a very pleasing tension. At the same store I grabbed the typewriter, I scooped a bag of random bits for $0.50. During construction, I was quite sad to find that my first choice of black screws for the legs from wouldn't take solder and then that I only had 3 nails. My firm intent to finish the piece before the night was over drove me to using the nails and suffering the absence of a leg. Given how, upon finishing it, the story for the piece *leapt* out at me, I'm happy with my choice.

The screw was just added to cover my mess and the pins a last minute attempt to add pins to the project since I love them so. After I used the spring for the tail, I was determined to incorporate more spring joints into the piece. Playing with the tail is fun and pushing that extra bit to "squish" it- where its leg gives out and it drops to its tummy- is a quaint feature.
Like all things made by her, the creatures served a practical purpose that was obscured by a layer of secrecy and infused with a feeling of spite. The little assembly of messengers might appear impractical at first glance- larger then any folded slip of paper and prone to being noticed due to scuttling sounds as they traveled. A flock passing down a dark corridor would make the hair of any listener stand on end, so eerie was their faint metallic clicking of furiously moving limbs. But unlike a slip of paper or a errand boy prone to cracking under torture, the little constructs would never give up their message to any but the designed recipient. And while a slip of paper can be burnt before opening or a mortal messenger evaded, these devices would not rest till their intended knew exactly what the Master Architect wanted them to, no matter how unwelcome the words may be.

The contents which were spelt out via miniscule metallic twitches and the striking typebars were of course encrypted along with fall-backs in the event that not all arrived. The reactions of the message recipients varied. Some found the creatures to be delightfully quaint and amusing. Others shuddered with revulsion as they pressed the constructs' quivering typebar tales to encode their response. Miss Wells abhorred the little constructs- no doubt viewing them as perversions distantly related to her beloved press- and took every opportunity to vent her irritations and frustrations of them and their creator upon their delicate forms. If the messenger was not required for her response she would catch and destroy it, a task becoming increasingly difficult as they seemed to have learned to fear her. Any returning to Master Fletcher were sure to be damaged up to, but just shy of, being incapable of functioning: legs torn off, antenna battered, springs bent. One wondered why the Architect spent the effort on such a clearly doomed creation and if perhaps she would stop should Comrade Wells be less obvious in displaying the irritation they caused her.

Sunday, July 8, 2007

Project : Glass Box

Project : Glass Box
Date : Some time in June 2007?
Materials : Glass, solder, flux, copper tape, wire, [mirror for Trisha's]
Tools : glass cutter, plier, soldering iron
Finished Product:


On the left is my box, on the right is Trisha's.

Process:
Who knew cutting glass was so easy? The blade fairly flies across the surface with ease and speeds that in truth make it a tad bit difficult to control. Anyway, you slice up the glass, wrap copper tape around the edges, and liberally apply flux to the tape so that the solder will take. If you're smart, like Trisha, you lay solder down on the edges individually. Then try to hold the pieces together and re-heat the solder to attach them- or in my case, struggle to hold two pieces of glass, an iron, and apply solder at the same time. My addition of wire was easy- bend it about, tape it down, and seal with some solder. Afterwards, you wash everything off and declare it done.


Thoughts :
Mine turned out lumpy, unevenly cut, and unattractively thick with solder. Also, the "door" doesn't stand up. But, considering it was my first attempt at anything involving glass, and my first artistic use of a soldering iron, I absolutely love it. The speed of the project counters many negative qualities since it does not hold much "lost time". As fabulous as I found it, I don't think I'll get much into glass. I lack any talent with geometric shapes and have little interest in developing one. I can appreciate and marvel at Trisha's works yet feel little compulsion to try a rival work- an interesting and pleasant sensation for me.
"You didn't actually expect it to stand up, did you? I mean... two hinges are common in all doors for a reason."
"I know, I know... It's just..."
"Maybe if you made the coil longer."
"I know..."
"Or tighter, less wiggle room."
"I know."
"But really, two-"
"I know damnit."

Friday, July 6, 2007

Image : Lilly Tree

Title : Lilly Tree
Date : Some meeting, mid-winter 2006-2007
Media : All pen, no pencil. Minor post-scan touchup
Image:
LillyTree


Thoughts :
For a sketch with no pencil guidance, it most soundly rocks. In no way does it relate to actual Gaslight story lines, real or imagined.
In the back of her mind, perhaps she knew what sort of fate she sealed for herself when she bit into the pear. But in all likely hood, she stood staring at that wretched fruit too consumed with hatred for the faeries to be much shocked.

The tingling in her scalp would have sent any normal London miss into hysterical fits of screaming. The twisting vines about her boots and ankles ruffled her sense of modesty, but what did modesty much mean when the slowly lifted hem of her skirts, pushed up by ever thickening vines, revealed not the pretty curve of calf but rather a solid wooden trunk. It was her hand, in truth, that gave her fright. That appendage which channeled so much of her power- through deftly handled wrench and lighting quick pen strokes. Her last breath was drawn into her lungs as a horrified gasp. The sensation of vines sprouting, crawling across her scalp was the last she felt- the becoming of wood overtaking her fully after that.

And so she stood, a wooden woman made half of sprouting tree, still clothed in her fine, fashionable London dress and holding that fruit which cursed her. Though it soon rotted, she remained- each bud flowering to reveal fruit with a mechanical pit and, in time, no fruit at all but rather a unique wooden gear.

Wednesday, July 4, 2007

Project : Gear Flower

Project : Gear Flower
Date : Some time in February 2007
Materials : Acid [type?], sharpie marker, sand paper, brass square, rubbing alcohol, baking soda
Tools : plastic tub, chop sticks, rubber gloves
Finished Product:

Currently a paper clip is taped to the back of it so it may hang in my cube.

Process:
You take a chunk of etch-able metal (brass and copper were the only options I was made aware of) and you sand it clean. Perhaps a dash of rubbing alcohol, the point is to make it smooth and clean so that there are no rogue spots when you etch. Now you mark up that bit o' metal with a "resist"- in my case a very fine brand name Sharpie marker did the trick. What you cover will not be etched, obviously. The trick I found was wrapping my mind around "lines" which would be neither etched or un-etched, but rather level changes. You see this in the chain links and definition of the gear. Leaving gaps or drawing thin lines were the best methods of definition, rather then settling only on broad silhouetted. Be careful with pencils, I found they left faint marks, working as very weak half-assed resists.


Now you've drawn on it, drop it in a tub of acid. The acid should be in a plastic or glass tub and safety measures such as rubber gloves and glasses wouldn't hurt. Keep some baking powder (baking soda?) on hand to neutralize the acid. Let it sit for a while, jostling it occasionally (we used chopsticks). Be mindful that a buildup will probably form if you let it sit absolutely still, leading to a sort of odd tightly drawn saranwrap look at the edges of resist. Time of sitting may varry, I believe we were using 15-30 minutes. Remove and coat liberally with baking powder to neutralize acid. Scrub, powder, water, scrub, you get the idea.

From this point, personal preference kicks in. I found I liked the look of cleaning it via rubbing alcohol, re-coating the ENTIRE thing with Sharpie, then sanding lightly the surface. This highlights the edges and lets the un-etched segments pop out more. If you don't like the look, you can always re-clean via rubbing alcohol.


Thoughts : Given my short-notice need to come up with an etch-able idea, I found the gear flower adaption worked very well. The font and my grammar are lacking, but when are they not? The gear surface is by far the best aspect of the piece, while the riveted leaf failed to come out clearly. I found the screw heads in the corners added that much needed final touch. If only one corner wasn't bent...

The subject of the gear-flower is only tangentially related to my (fictionalized) Gaslight universe:

The earliest strains were firs breed by Master Lilly Fletcher in the year 1871. There has been much speculation in the community and across the guilds as to how she first coaxed that metallic gear from the flower bud- rusty fertilizer, the grafting of a pocket watch, and brute force magic all candidates depending on who you ask. Though she was known to keep company with several prestigious Physic & Sorcererous guild members, Master Fletcher never offered co-authorship credit to anyone for her work and none tried to take it.

The first varieties which produced wooden gears are not recognized as being especially note worthy- displaying nothing more then excessive topiary skill and being of little use due to structural integrity for actual work. It was only with the revelation of possible uses- and the clear financial benefit- of the farmed gears that the plant was hailed for the marvel that it is.

Sunday, July 1, 2007

Project: Bullet Bugs

Project : Bullet Bugs
Date : Weekend of July 1st, 2007
Materials : bullet casings, pins, solder, flux, a tiny watch part, some screw extender part, tiny sliver of copper tape
Tools : Soldering iron, pair of pliers, tweesers, knife, clay
Finished Product:


Process:
You take some pins, bend 'em. You take some casings and slap some solder down. Solder the tips of the pins and then join 'em. Ta-da! Very easy. The "snout" of the silver headed one didn't want to take to the solder so I laid down a strip of copper tape that Trisha had given me from her stained glass supplies.

The proboscis, which came from a watch winder I think, was lost in the wilds of the rug for no short period of time. But I was intent on that look, no other part would suffice! And so I brought over an unshaded lamp and proceeded to examine the carpet. I felt much like a crime scene investigator, waving my magic light in search of that one little speck.


Thoughts : -- will hunt inspiration links down later. Mainly, I wanted to use pins.
Written by Eric & inspired by Rival Guy:
Bullet Bugs:

Due to poor accuracy, mostly harmless in small numbers. But disturbing a swarm will lead to a synchronized attack that showers an entire room with bullets instantaneously.

Afterwards, their surviving kin will come and reclaim their corpses to cannibalize parts for building others. They'll also check the corpses of their victims for munitions to build new members. They can convert nearly any type of round. Large swarms have even been known to convert artillery rounds into their own, leading to the military's abandonment of several bases after their munition stores became infested. There are unconfirmed reports of one swarm attempting to convert missiles...