Monday, October 1, 2007

Review : Book : The Scar

Book : Perdido Street Station, by China MiƩville
Data : mid June 2007
Genre: Steampunk

Brief, spoiler free review : Perdido Street Station is a cruel, cruel story. It is a breathtakingly well described and beautiful in its detail, even when describing the most evil or wretched of things. I'm more fond of The Scar, but such is the side effect of starting mid-series I find.

As usual, if you can stomach it, I recommend reading the story without a clue as to what it's about. Avoid that dust jacket summary and dive right in.

Review:


Inspired Sketches:


Lin & a cactacae


Monday, September 3, 2007

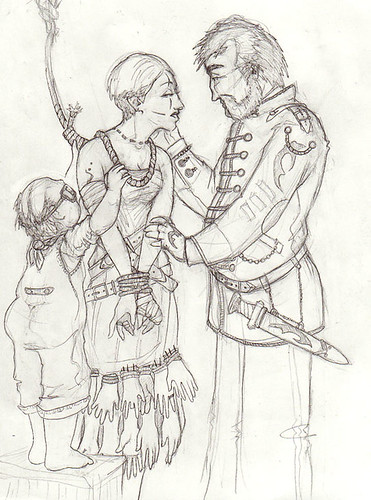
Image : Hand Skirt

Project : Hand Skirt
Date : September 16th, 2007
Media : Pencil sketch gone over with a 0.03 pen

Image:
HandSkirt


Thoughts :
I did this while stuck on a flight from San Fran to Germany for work. Started with just the woman's face, then the midget because I couldn't bring myself to erase some of the hands, and then... I don't know. It went from there and a very clear story unfolded in my mind mid-way through the sketch. The rest of the image was like playing a game- illustrating tidbits I thought of and trying to rationalize things I illustrated. In the end, I'm very fond of it. I also found that such things make me a good candidate for long flights since the trip and seat confinement bothered me not one bit as long as I could sketch.
I currently have it hanging on my cube wall despite several disparaging comments against it by a coworker who seems to especially dislike it of all my pieces. Screw him- looking at it pleases me.
I would be highly inclined to trade artistic favors if anyone managed to write a short (or longer!) story based off this image...
He reached up to caress her face and was met with a heavily lidded gaze filled with cold disgust. It broke his heart that his faith angered her so- he had tried so hard the bloody night before to explain it to as they purified her for this dawn. How could she not see that this sacrifice was the highest sign of his love. To lose her hurt him more then the hangman's noose could ever inflict upon her.

He felt no anger at her for the enchantment cast upon him as he and his men had ridden up to the cottage. In fact, it rather pleased him to know that this unnatural adoration she inflicted upon his heart would be useful upon his eventual return to court. No saucy Duchess or sultry Baron's daughter could ever manage to cloud his reason with worldly wants now. His heart was forever bound to his witch, he knew this. But in order to ensure their eternal bliss he had to do this. Those fingers and flesh distorted from a lifetime of dealing with the Dark Arts had been lovingly parred from her by his very own hand. He was strong enough think ahead- to lose her in this life time was worth their eternity together.

Besides, she was a witch and had long since lost the fear of death. It was not the noose, but rather her failed attempt to enslave him that made her so recalcitrant this morning. The least he could do was let her wear her bloody skirt, sewn from the hands of her victims, on this, her last day.

Saturday, September 1, 2007

Project : Egg Shell Monsters

Project : Egg Shell Monsters
Date : Mid to end of September 2007
Materials : Egg shells, clay, solder, pins, copper tape, flux, hot glue
Tools : Soldering iron, hot glue gun, pliars, oven
Finished Product:


Process:
So you make some hard boiled eggs. Then you eat them. Best instructional steps ever, yes? Just be careful when you shell them- I used an exacto knife on one to pre-crack around the center. I found trying to salvage only one side of the shell per egg was best- the big endians working better. Let them sit for a day or two to dry and what not.

For the robo-egg, just lay down copper tape around the inside of the shell, prime with solder. Pre-bend the pins so that they poke out from the edge of the shell after a tight u-turn and attach. Then add the next segment of the leg. The end.

Hand-egg used twisted tinfoil as the base for the hands. Sculpt accordingly. I did not glue until after both were done. Be mindful of how the clay will contact the shell. Hot glue into place after legs are baked.

Thoughts :
The legs on robo-egg aren't insectil enough for my tastes. The angles at the joints are too wide, leaving it to sit too low to the ground. I've since picked up T-pins which I may use for another version later. The hand-egg was meant to be a leg-egg but I couldn't sculpt legs. This makes me sad. The hands aren't actually the same size, but it's okay because it looked like overly dramatized perspective. Feature, not a bug. Riiiight....

    Curios, she picked up the little creature as it scuttled past her yet again. With a delicate touch she pinched the shell and lifted it straight off the table, its tiny legs kicking frantically. She turned it upside down in an attempt to examine how the furiously moving legs attached to the shell. Look at it as she might, she felt her eyes unfocus or simply slide to one side or another.

    "Please put him down," the witch said as she returned to the room, carrying the tea tray.

    Sam felt guilty being caught prying and quickly did as the woman asked. Dropping the creature, she chipping the rim of it's shell with her haste. Unphased by the damage, the thing quickly scurried away around a corner as the witch came over and set the tray down.

Friday, August 3, 2007

Project : Steampunk Hair Piece v.2

Project : Steampunk Hair Piece v.2
Date : Aug 20th, 2007 one evening
Materials : Adjustable crescent wrench, wire, philips screwdriver (broken), streach red velvet, hot glue, solder, flux, thread, copper tape
Tools : soldering iron, needle, pliers, hot glue gun
Finished Product:

Process:

Images from v.1, now lost


Ridiculously simple. Cut/break/hack up the handle of the desired screw driver. Solder to end of of the wrench. On the first version, I had to saw off the end of the wrench (which ate up a new blade) and only hot glued. On second version, I cut nothing but had to lay down copper tape onto the wrench handle for the solder to take. Thing wire was twisted about and soldered to for extra stability. A thick layer of hot glue was added for stability but mainly to smooth out the uneven surfaces. Stretch fabric was then wrapped around and sewn into place. Make sure the stretch runs around the girth of the tool.

Version 2.0 is 6" long. The wrench half is 1.5" which is ideal. The center is 2" and does not taper smoothly on the screw driver side which makes it difficult to wear. This could be fixed if I were to cut the fabric off and reshape with more hot glue. The screw driver is 2.5" which is okay, but I could have done with a bit more length.

Thoughts :
These things are very easy to make and very pretty to wear. The screwdriver on the first came in handy several times and I suspect the adjustable wrench wont be neglected. The only complex bit is in fact how to properly twist your hair up to wear it. Perhaps I'll document that next. Version 1 had a better looking tool while Version 2 makes for a better hair piece.
The boys at work always carry around their Lethermans and other fancy tools in their belts or in boxes. Whipping out pliers with a crack or folding up a blade with a snap. I've decided to not be outdone and designed my own tool to be carried around at all times. It makes no loud sounds when brought into use, signaled instead by a cascade of hair falling down my back.
Elegant and functional, I find it to be a key item to display my thoughts on the idea of "steampunk"


UPDATE: While visiting Seattle, end of August, Logan sort of sat on it and the solder joint broke. I now have an excuse to go back and make it better, which I've not complaint to do.

Wednesday, August 1, 2007

Project : Paper-Sewn Pillow

Project : Paper-Sewn Pillow
Date : August 20th, 2007 at dusk
Materials : Thread, fabric, book you can decimate
Tools : Soldering iron, sewing machine, needle, scissors
Finished Product:

Process:

I happen to have been burning pages for another reason, but wherever you get the paper should be fine. The burning of the edges isn't necessarily required, but I think it makes them more interesting then a boring straight cut. But then again, I do love to burn paper for any and all reasons. I cut the pages out of the book by drawing the outline and pressing a wide-tipped soldering iron around the path, burning it one centimeter at a time. Takes time, but the end look is worth while.

Then, sew them together on the machine. I used a wide stitch and nice visible black thread. Be mindful that you can really re-angle the two pages once you start sewing so make sure they're lined up just right. I left the ends as just long threads (no backing up over stitches) and tucked the ends under every time I joined pieces. You'll notice that the paper goes only to two sides, rather then all four. This is because I didn't want to shape it to the pillow's bulge and putting bend on the pages in two directions wouldn't work well.

Then, sew on the edge fabric. Then, sew the back of the pillow on, right sides facing. What I did was just sew the fabric-to-fabric parts. That leaves a whole side un-sewn and gaps where fabric meets paper. Then turn it right-side out. Now pinch the fabric at the fabric-meets-paper seems and use a fancy stitch to sew it close. This doesn't make for a perfect edge, but I figure it's stronger then trying to hand sew it and putting a lot of wiggle strain on the stitches.

I haven't quite figured out how to close the last fabric-to-fabric seem though...

Thoughts :
It looks mighty pretty, though it is severely impractical. The pages mean nothing, alas- they just come from some random stupid book. Using a meaningful book would be fun. Thoughts of laminating or re-enforcing it somehow are now being contemplated.
--image I left at home, will be uploaded by Thur Aug 23--

Wednesday, July 18, 2007

Image : Forced Grin

Title : Forced Grin
Date : July 27th, 2007
Media : Photoshop 7 & Wacom Tablet : Tie pen pressure to both brush size AND opacity for best results

Image:


Thoughts :
Done in 1.5 hours, from complete scratch, entirely on the computer? That's pretty amazing, for me at least. I'm normally wretched with CG sketching. It helped that I had such a fixed image of my head of a stitched on grin... I love the hands, the lace, and the teeth. Nothing but the tears look poor to me. How *does* one illustrate tears? I also don't think I quite captured the extreme distress of the grinner. What an odd feeling it is, as an artist, to try and capture an extreme negative emotion. Do we project an attempt at the mood upon ourselves? Are we inflicting it upon our subject? How can you capture the mood without feeling it in some way.
...Perhaps if I understood biology or psychology better I could explain this fact, but regardless I know it to be true- a mood is brightened by smiling. Your own false or force smile, a received smile, an offered smile. Any and all elevate the mind and the mood. Some may question the inclusion of a false smile but please do not miss-interpret it. I do not mean a sneering upturned corner of the mouth or a sulking twist of the lips offered up to some relative. Instead, replace your default blank expression with a slight curve of the mouth. At the very least, un-furrow that brow. Such strain often offers low level distress and you'll find you cannot keep it so tense and easily grin. ...

Sunday, July 15, 2007

Project : Wooden Bug

Project : Wooden Bug
Date : End of June 2007
Materials : Wood, pins, flux, solder
Tools : Soldering iron, pliers, hammer
Finished Product:

Process:
Find yourself a piece of drift wood that has a lot of character. Add to this character by burning into it patterns and designs with your soldering iron. Hammer a couple of pins into the body, bend them, then solder another set of pins onto the ends of them for segmented legs. A drop of solder on the first bent pin's turn adds to the look of large segmented bug legs. The end.

Thoughts :
It's a good idea, but I just don't know how to burn wood interestingly. The sucker patterns- neither patch of which are pictured here- were the most successful look. I will definitely try more of this, it is a pleasant mixture of nature and metal.

Friday, July 13, 2007

Project : Damaged Messenger

Project : Damaged Messenger
Date : July 12th, 2007
Materials : Type writer parts [most notably the N/n striking bit, levers, and springs], copper tape, copper wire, pins, nails, a screw, drift wood, flux, far too much solder
Tools : Pair of pliers, soldering iron, saw, hammer
Finished Product:


Process:

Yank out all the parts from the machine. I found gripping at the base with the needle-nose pliers and then just agitating it with constant little wiggles eventually broke the metal. Attach the striker to the.... 'tail spring' part. Cut a notch in drift wood and then cut to 'body' length. Line notch and base of wood with copper tape and spend far too long trying to both wedge the tail into place and solder it to the tape. Oh, and be sure not to let the tape fall off the wood. Score the wood with a soldering iron and wrap the base with wire- preferably catching it in the groves you just burnt. If you make a mess like I do, consider hiding it behind a screw which can also work in as a sort of anchor for the wires.

Now consider the hind legs. Wrap a thin strip of copper tape where you want one half of the spring to connect, then solder it down. Try, somehow, to bend them into a fitting position. Wrap the leg's connection point in copper tape and liberally apply solder to the entire thing. Struggle for at least 30 minutes to attach the legs straight to the tail, give up and wrap the wire around them for support. Now you'll find it's super easy to solder them down. Oh, if you really want to do it the Sithel way, be sure to damage your soldering tip somewhere at this stage. Now bend some nails and solder them to the copper tape, this can also help prevent wire wiggling and further anchor down the tail.

If you're not lazy, you might consider permanently attaching the other half of the springs, but I didn't bother. Add flare for personality such as pins for antennae and a stupid burnt gash for a mouth.

Thoughts :
So I found an old, semi-electric typewriter at an recycle store and nabbed it for a reasonable price. The keys are far from pretty, but I found myself drawn to the myriad number of springs and levers in the back, as well as the strikers which are so unique to the machine.

I list this as being quick- about 3 hours total- but I had spent nearly an entire evening previous pulling the machine apart and getting familiar with the pieces. It helped that I sad down the evening of construction with a relatively clear image in my head of what I wanted and how I'd get it from the start.

My original intent was a sort of scorpion feel, it turned out more grasshopper-esque, and photographs like a spider! The pivot for the "tail" is a unique and very fine piece I pulled from... somewhere. It was a fight to overcome the "I must save this till the *perfect* project comes up" feeling in order to actually *make* something. The key is of corse unique, but I'm not overly fond of the letter. The legs came jointed- they connect to the strikers so I've got quite a few left. The springs from below the keys- no shortage of supply there- and are of a very pleasing tension. At the same store I grabbed the typewriter, I scooped a bag of random bits for $0.50. During construction, I was quite sad to find that my first choice of black screws for the legs from wouldn't take solder and then that I only had 3 nails. My firm intent to finish the piece before the night was over drove me to using the nails and suffering the absence of a leg. Given how, upon finishing it, the story for the piece *leapt* out at me, I'm happy with my choice.

The screw was just added to cover my mess and the pins a last minute attempt to add pins to the project since I love them so. After I used the spring for the tail, I was determined to incorporate more spring joints into the piece. Playing with the tail is fun and pushing that extra bit to "squish" it- where its leg gives out and it drops to its tummy- is a quaint feature.
Like all things made by her, the creatures served a practical purpose that was obscured by a layer of secrecy and infused with a feeling of spite. The little assembly of messengers might appear impractical at first glance- larger then any folded slip of paper and prone to being noticed due to scuttling sounds as they traveled. A flock passing down a dark corridor would make the hair of any listener stand on end, so eerie was their faint metallic clicking of furiously moving limbs. But unlike a slip of paper or a errand boy prone to cracking under torture, the little constructs would never give up their message to any but the designed recipient. And while a slip of paper can be burnt before opening or a mortal messenger evaded, these devices would not rest till their intended knew exactly what the Master Architect wanted them to, no matter how unwelcome the words may be.

The contents which were spelt out via miniscule metallic twitches and the striking typebars were of course encrypted along with fall-backs in the event that not all arrived. The reactions of the message recipients varied. Some found the creatures to be delightfully quaint and amusing. Others shuddered with revulsion as they pressed the constructs' quivering typebar tales to encode their response. Miss Wells abhorred the little constructs- no doubt viewing them as perversions distantly related to her beloved press- and took every opportunity to vent her irritations and frustrations of them and their creator upon their delicate forms. If the messenger was not required for her response she would catch and destroy it, a task becoming increasingly difficult as they seemed to have learned to fear her. Any returning to Master Fletcher were sure to be damaged up to, but just shy of, being incapable of functioning: legs torn off, antenna battered, springs bent. One wondered why the Architect spent the effort on such a clearly doomed creation and if perhaps she would stop should Comrade Wells be less obvious in displaying the irritation they caused her.

Wednesday, July 11, 2007

Review : Book : The Scar

Book : The Scar, by China MiƩville
Data : Finished some time around the end of May 2007
Genre: Steampunk

Brief, spoiler free review : I believe the most vital bit of wisdom I leave this book with is: "Be careful what I wish for." See, I came by this book through a friend with whom I pleaded and begged a reading recommendation from. When asked for what I wanted, I firmly replied with these two facts: "An interesting villain" and "cruelty toward the characters." The first I found makes every good book great and every pithy book bearable. The second is something I don't run across often and am interested in. The lack of cruelty is no doubt simply a symptom of my predominantly fantasy based reading diet- dragons, magic, perhaps the occasional strong female lead, and always a happy ending. Mind you, this particular search had already been narrowed down to the genre of "steampunk". Not only does this book nail my request, it repeatedly beats me over the head with them, nearly leaving me to whimper and regret I asked for them in the first place. Nearly. I came away from the book immensely pleased with the blend of fantasy and clockwork tech, still reeling from the actions within it, and with a ravenous need for more by that author. If you can stomach the nauseous blend of depressing, vicious actions and puffed up pretentious language, I highly recommend it.

Review:


Inspired Sketches:


Tanner

Sunday, July 8, 2007

Project : Glass Box

Project : Glass Box
Date : Some time in June 2007?
Materials : Glass, solder, flux, copper tape, wire, [mirror for Trisha's]
Tools : glass cutter, plier, soldering iron
Finished Product:


On the left is my box, on the right is Trisha's.

Process:
Who knew cutting glass was so easy? The blade fairly flies across the surface with ease and speeds that in truth make it a tad bit difficult to control. Anyway, you slice up the glass, wrap copper tape around the edges, and liberally apply flux to the tape so that the solder will take. If you're smart, like Trisha, you lay solder down on the edges individually. Then try to hold the pieces together and re-heat the solder to attach them- or in my case, struggle to hold two pieces of glass, an iron, and apply solder at the same time. My addition of wire was easy- bend it about, tape it down, and seal with some solder. Afterwards, you wash everything off and declare it done.


Thoughts :
Mine turned out lumpy, unevenly cut, and unattractively thick with solder. Also, the "door" doesn't stand up. But, considering it was my first attempt at anything involving glass, and my first artistic use of a soldering iron, I absolutely love it. The speed of the project counters many negative qualities since it does not hold much "lost time". As fabulous as I found it, I don't think I'll get much into glass. I lack any talent with geometric shapes and have little interest in developing one. I can appreciate and marvel at Trisha's works yet feel little compulsion to try a rival work- an interesting and pleasant sensation for me.
"You didn't actually expect it to stand up, did you? I mean... two hinges are common in all doors for a reason."
"I know, I know... It's just..."
"Maybe if you made the coil longer."
"I know..."
"Or tighter, less wiggle room."
"I know."
"But really, two-"
"I know damnit."