Wednesday, September 10, 2008

Project : Chewie-kun

Project : Chewie-kun
Date : August-ish 2008
Materials : Brown fake fur, brown simple fabric, red satin-y fabric, two beads, thread, stuffing, 2 batteries, tinfoil
Tools : Sewing machine, scissors, needle
Finished Product:
ChewieKun_hangin ChewieKun

Process:
After sketching out an initial rough idea, which took the Chewbacca character and tried to make it as simple as possible, I just went at it with rough paper patterns and cut into the fabric. As I usually do when working with little fore-thought, I cut most pieces large and simply trimmed & tucked them down as I went to achieve the shapes. Made the torso first, then the head (lower jaw and upper skull being separately constructed pieces). Before connecting fuzzy head together, I sewed the inner mouth down with fancy red fabric. . The limbs were cut and made, bottom first. They have a slight flare as the limbs extend. Sewed a "kink" into the legs where the knees are. I wanted him to have more weight and hang better, so I stuffed the bottom of his feet with old batteries. I can't remember if I put them in the feet alone, or all four limbs. Used the basic brown fabric to make little circle caps at the end of the limbs. Added eyes. He didn't quite scream Chewbacca enough so I went and sewed a little sash, put a pouch at the end, and then folded tinfoil and sewed straps down for it. The end.

Thoughts : Gave it to my ex-co-worker and good friend Darren, who seemed to like it. That's good. The quality of craftsmanship was kinda' iffy... the fur hid my stitches while preventing me from making strong ones... The batteries in the feet added an adorable weight to it- making them swing back and forth just so- and seemed like a great use of dead batteries. I am holding onto all future dead batteries for such a purpose. Does anyone know if this can cause a problem somehow? The tinfoil "amo" was very tacky, but the belt was nice. Put a coin in the pouch, adding a nice weight. Given how quickly it was made, and how hard it is to mach Chewbacca fur specs from your average craft stash... it all turned out as a lame "okay".

He shuffled forward, long arms swinging back and forth and the fur around his feet rapidly accumulating a thick coating of dust bunnies. He could feel them dragging him down slowly, the Will of this space wishing him to stop and stay. The back of the couch towered above him, allowing only a thin sliver of living room light to tickle down. Ahead he could see the crumpled form half standing- propped up by wall and couch.

Something made a scuttling sound under the couch and Chewie-kun made a low moaning sound in fear. At the noise, Han Solo's stubby arm jerked and tried to wave. He wasn't as well stuffed as the fuzzier toy and the therefor was not able to right himself on his own. Han had only fallen behind the couch yesterday but already a heavy layer of cobwebs and dust had settled on him. A little fabric leg was bent and hidden entirely by the couch as if something had tried to pull him under.

With a growing roar, Chewie-kun shuffled faster for the last couple steps and charged full force- or as forceful as a toy can- into Han. There really was no better way to do it- when you've no hands but just fumble-y appendages, pushing and pulling in close quarters becomes hard. Both carried forward half a foot or so before landing in a pile. With his head lower, Chewie-kun could see something metallic glint in the dark under of the couch.

"WUUUURRrrrrrrr!" Chewie shouted, sweeping a limb back and forth to fend off the threat. Han had managed to squiggle over him and was limping and flopping toward the other end of the couch. Kicking and swinging his limbs, Chewie-kun continued, trying to follow. They *had* to get out now, or risk being trapped here forever- forgotten and molding!

Sunday, April 20, 2008

Squeaky Toy Monster

Project : Squeaky Toy Monster
Date : September 07 - October 07
Materials : Squeaky toy, yarn (2 types), buttons, fabric, thread, stuffing
Tools : Sewing machine, needle, crochet hook
Finished Product:
Squeaky... thing...


Process:
Ugly Squeaky

Take a squeaky toy- this one having been bought spur of the moment like at a checkout stand for $2. Crochet around it. In my case, mine was spherical and spiky. I noticed the spikes were sticking through the shaggier yarn so I switched half way through. Go back and start making a head. Switch halfway through to the limbs. In this case (and in general good practice) it's always good to do 1/2 to 3/4ths of the legs on all of them or at least a a pair on each before you finish them. I used a curve of black for hooves since I believe I was running out of yarn. After a long delay, I came back to it and not wanting to crochet more since it would muddy the look of the thing, I sewed a simple beak and attached it along with 2 (different sized) button eyes. Fin.

Thoughts :
Totally random project. I was visiting Seattle and came ill-prepared for the planned craft day. Grabbed the toy and yarn day of and did most of the base and some of the limbs in one sitting. I really like the curve of the hind legs and the hooves son all of them. The beak was the result of laziness but still looks good. It did take multiple sittings and there was a *massive* delay in the middle, but I'm still going to list it as "time: quick" since it was light speed compared to my normal crochet projects
Do not ask me what it is. It is made of yarn- do you know of any creatures made of yarn? No, I didn't think so. So why should it be confined to 'being' some creature of flesh and blood that you are already familiar with? It is like a gargoyl, made from an unliving substance, suggestive of many different creatures and yet very firmly of it's on kind. And like a gargole, it perches upon my castle walls and watches over me, protecting.

Of course, when I say "perches" I mean barely balances and my castle walls are rather short and defining a very personal eight by eight plot of office space. The only protection it offers notification of incoming attack with a loud squeak since my cube-mate, when arriving or leaving, can not seem to avoid squeezing it and, if I'm unlucky, chucking it blindly at me over the wall.

Wednesday, March 12, 2008

Project : Skull Bear

Project : Skull Bear
Date : January 2008
Materials : Wire, tin foil, clay, white out, hot-glue, a pinch of fabric, yarn (2 types), thread, beads (temporarily)
Tools : Crochet hook, needle, hot glue gun, oven
Finished Product:
Skull Bear FinalSkull Bear Final


Process:
Skull Bear : rough finishSkull MonsterSkull Bear : rough finish

Given that I'm a poor sculptor, I started with the head. Looking back, I would have started with the body- as I do with almost all my projects- and *then* done the head. Sigh. Live and learn. Anyway, I bent some wire and used some tinfoil and then some clay and BAM, I made a skull. Of course I was desperately looking at photos while I did this and it still sucked. There's a skull top and seperate jaw, mind you. Baked them, then painted 'em with white-out. Started crocheting the bear. Had massive, massive, *massive* problems sculpting it correctly. Left a gap at the bottom and also inserted a wire spine. Got glued a scrap of fabric to the clay bits and then sewed that to the yarn. Had difficulties sewing it such that the two would line up. Then I crocheted the limbs. Put very stupid looking beads on as claws, closed up the rump and called it good. Went away for a while, then came back to it. Sculpted clay claws and then went over the chest with some re-shaping crochet and added an (ugly) tail. During this all one of the teeth broke off but was easily hot glued back on and then repainted with whiteout. Several paint touch-ups were needed throughout but luckily whiteout is easy to find, use, and dries fast (the reasons I picked it)

Thoughts :
Good first try. Interesting idea I will have to try again. Skulls are a bitch though- hard to draw, hard to sculpt. Toy was made upon request for Moonykins for the Ohantra character. You can see I was less successful adapting this one- moved it from an on-all-fours character to a more doll-like form. Also the shaping around the jawline failed despite my best efforts. Really, I blame working head-first for most these problems. It's actually really fun to play with. I like making the mouth open and close to sing along with whatever I'm listening to. The sculpted claws are also quite awesome- the hands are individual claws while the toes are fixed in a row.

Project : Furry Doll

Project : Furry Doll
Date : Feburary 2008-March 2008
Materials : Fabric (white, pink, orange, green), pink wool, yarn, thread, stuffing, embroidery floss (green, black, pink), rice?
Tools : sewing machine, needle, scissors
Finished Product:
Furry Toy

Process:

Shockingly simple once the basic form of the head was settled on. Unfortunately I shipped the toy of months ago and cannot remember/figure out from photos how the head was shaped... I think there was a connection between head and neck, but maybe not? You can tell there is a clear connection between neck and body. Head and body were connected, then the legs made, compared, and then connected. Next the arms were made, compared, and connected. In both cases an incorrect limb was made that was discarded. Filled with rice (I think?) to achieve a heavier feeling. Very basic. The hair was small chunks of wool pulled through the fabric. The eyes, eyebrows, and mouth were embroidered on while the nose was an actual scrap of fabric. The headband and tank-top straps were yarn. The cloths were extremely basic in design- basically just tubes and the straps are only tucked into the shirt, not sewn.

Thoughts :
So much disdain for this project! Ick! It was an interesting practice on matching a photo and doing something I didn't find interesting. The character was made for the real-media-exchange and then mailed off. It was based off this character. I know a lot of what I would call furry artists on the net and a couple mild "furries" but the more hardcore furries freak me out.

Despite my loathing of it, I *do* think it turned out really well. There just some poor puckering around the snout but other then that it's a good match. It's important to note how much better the doll looks with the cloths- a major improvement for minor work. The hair was sooooo much fun to do! I'm excited to try it again. The fabric was of poor quality and it took quite a beating pulling those chunks of wool through it, but it survived and playing with the hair is by far the best part of the doll.

"Glowsheep : Most cursed project ever?
I should honestly just mail this off ASAP before my house burns down or something.

Started off by losing the needles I was using/needed for it.
Spent half an evening searching for my white thread.
Then I lost the vibrant orange fabric for the pants.
Then I lost the right thread for the blouse top.
Then I lost my CAMERA to take pictures of it."
-- excerpt from my post saying I'd finished the project. I lost something else as well, but can't remember it at the moment

Project : Mook-Mook

Project : Mook-Mook
Date : February 2008
Materials : Yarn (2 colors), wire, stuffing, embroidery floss (black), fabric, thread, beads
Tools : crochet hook, needle, sissors
Finished Product:
Mook-Mook1Mook-Mook3Mook-Mook2


Process:
MookMook : Early Stage

With the crochet monsters there is both a technique and a wild attack that goes beyond words. Some day, I'll write up the technique...
I started at the throat and crocheted down. Giving a monster a "tummy" may make it look better, but switching back and forth between the yarns as you makes for a less fluid flow. The mid-section has only a minor bulge relative to the thickness of the neck. Went from the neck and crocheted up one throat, then back to the neck and up a throat and most of a head. I switched back to the first head, finished that, and then finished the second head. Then the hind legs were added, the bottoms staying open. A two pieces of pipe-cleaner were stuck through the body and then crocheted (tightly) over on both sides to create the front arms. Little circles of fabric were cut and then sewn to the bottom of the feet. Some stuffing was affixed to the rump- I can't remember if it was pulled through with a hook or needle or flat out needle felted on. The ears were added- nubs of crochet with a tiny triangle of fabric sewn on the back. Eyes were added and then little triangle noses sewn on with floss. Somewhere in there I went back and crocheted over the chest a bit to correct the shaping.

Thoughts :
I don't know where the name Mook-mook came from, but it struck me day one and stuck. He was created for a Ravelry craft exchange based on someone else's sketch and I'm very, very sorry to see him go. I'm fond of the girl he went to though and I got a *fantastic* creature in return so I don't regret doing so... but still there's sadness. This is the first of my monsters that both the Greatest Living Philosopher and I like.
Despite looking so cute at the end, he went through some rough times. At a Dr. Sketchy's session, the lady next to me said it looked like a penis wishbone mid-way through. And when I was picking up eyes, my friend claimed to be highly skeptical of how it would look... although seeing the final product I know that the eyes are the key to the "cute" look. Relatively easy to make... the rabbit tail idea was random and I should do pipe-cleaner arms like that more often. Last thing to note is the tag. I saw many tags like this at the Swedish Natural History museum, hanging from the legs of long dead creatures, some times typed, sometimes handwritten. I feel they bring a sort of credible, sophisticated look to the creatures that I strive for. This one was lovingly made and I feel really adds to the look. (The tag was nabbed from work... I NEED to find where it comes from so I can buy handfuls of them)
The tag reads:
    Mook-Mook
   Mookion mookus (in italics)
   First seen by Pam M
   Caputred by Rebecca
   Winter 2007-2008 (in italics)

Sunday, November 4, 2007

Project : Squid Kitty aka Octo-puss

Project : Squid Kitty
Date : September - October, 2007
Materials : Fabric, ribbon, a bell, thread, stuffing
Tools : Sewing machine, scissors, straight needle, curved needle
Finished Product:


Process:

I'll be upfront that the kitty head is not my creation. I nabbed that from the book Soft Animals A to Z. The neck down was simple but of my own doing. The ribbon & bell not only looks awesome by really highlighting the kitty aspect, they also nicely cover the seam between the two parts. No eyes were really fitting and so were left out- only the scrap of fabric for the nose.

So, to start with. Make the head. I want to say it was 4 pieces of fabric- muzzle, sides of face, top of head... maybe a chin piece as well (I don't have the critter on hand at the moment). After that, it's simple. I used 3 large pieces of the white to make the body and individual strips for top of squid legs- on the body: one for either side and a dart down the front to help for shaping (since this had little pre-planning).

Interesting note about the body/tentacle joint shaping: it looked very much like V-V-V-V per side. Note that the segments between the legs actually extends down past the start of the tentacle. This fabric was cut on the side like so |_|_|_|_| , folded up under itself and sewn to the tentacle leg. This made the webbing and the lack of seam between it and the body really improves the look. Keep in mind that the webbig will "bow" nicely since the legs sit between edges that used to be connected- no fabric is removed from the body!

Wedges of pink (slightly longer and thinner then their white tops) were cut and sewn to the underside of the tentacles before the tentacles were attached to the body. The center was very mushed together, I just folded and sewed the ends of the pink wedges together and then pushed them (with a still open seam in the very center) up into the squid kitty body. Not a bad look (the opening isn't visible), easy, and allows for future work.

Thoughts :
Very awesome looking though sadly made out of the cheapest fabric I had since it was only supposed to be a random project. The lack of eyes goes very well with the squid half of the body. If I had done this a smidgen more professionally, it would be my most marketable creature by far. The fact that I used someone else's pattern for the head (it was VERY educational!) makes me feel as if I cheated though. I desperately wanted to add suckers to the bottom- tried buttons, embroidery, even actual suction cups. Sadly they all looked foolish. I've got one last idea of coiled yarn, but I don't feel I should spend any more time on this project. Perhaps next time. I'm considering a higher quality version that is ACTUALLY a squid... The idea initially comes from Neal's response to my "give me stuffed animal ideas!" post- her answer: "squid cat", the Greatest Living Philosopher directed me to put the tentacles on the bottom and not the face, and the opening scene of The Scar with the hunting squid was a strong inspiration as I worked.

Given its lack of eyes and albino coloration, it clearly dwells in the Deep. And what is any cute little kitty, with it's snow-white fur and little bell upon a ribbon without the accompanying Miss who owns it? What better pet for Lady Cthulhu than this little kitty... thing?

Monday, October 1, 2007

Review : Book : The Scar

Book : Perdido Street Station, by China MiƩville
Data : mid June 2007
Genre: Steampunk

Brief, spoiler free review : Perdido Street Station is a cruel, cruel story. It is a breathtakingly well described and beautiful in its detail, even when describing the most evil or wretched of things. I'm more fond of The Scar, but such is the side effect of starting mid-series I find.

As usual, if you can stomach it, I recommend reading the story without a clue as to what it's about. Avoid that dust jacket summary and dive right in.

Review:


Inspired Sketches:


Lin & a cactacae


Monday, September 3, 2007

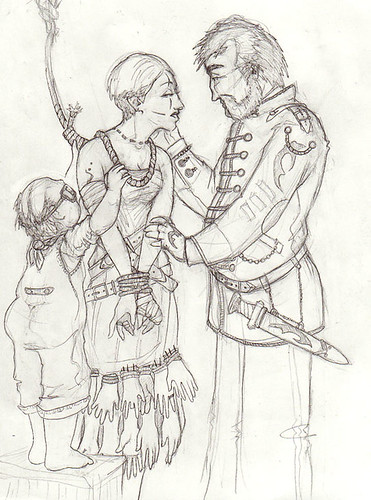
Image : Hand Skirt

Project : Hand Skirt
Date : September 16th, 2007
Media : Pencil sketch gone over with a 0.03 pen

Image:
HandSkirt


Thoughts :
I did this while stuck on a flight from San Fran to Germany for work. Started with just the woman's face, then the midget because I couldn't bring myself to erase some of the hands, and then... I don't know. It went from there and a very clear story unfolded in my mind mid-way through the sketch. The rest of the image was like playing a game- illustrating tidbits I thought of and trying to rationalize things I illustrated. In the end, I'm very fond of it. I also found that such things make me a good candidate for long flights since the trip and seat confinement bothered me not one bit as long as I could sketch.
I currently have it hanging on my cube wall despite several disparaging comments against it by a coworker who seems to especially dislike it of all my pieces. Screw him- looking at it pleases me.
I would be highly inclined to trade artistic favors if anyone managed to write a short (or longer!) story based off this image...
He reached up to caress her face and was met with a heavily lidded gaze filled with cold disgust. It broke his heart that his faith angered her so- he had tried so hard the bloody night before to explain it to as they purified her for this dawn. How could she not see that this sacrifice was the highest sign of his love. To lose her hurt him more then the hangman's noose could ever inflict upon her.

He felt no anger at her for the enchantment cast upon him as he and his men had ridden up to the cottage. In fact, it rather pleased him to know that this unnatural adoration she inflicted upon his heart would be useful upon his eventual return to court. No saucy Duchess or sultry Baron's daughter could ever manage to cloud his reason with worldly wants now. His heart was forever bound to his witch, he knew this. But in order to ensure their eternal bliss he had to do this. Those fingers and flesh distorted from a lifetime of dealing with the Dark Arts had been lovingly parred from her by his very own hand. He was strong enough think ahead- to lose her in this life time was worth their eternity together.

Besides, she was a witch and had long since lost the fear of death. It was not the noose, but rather her failed attempt to enslave him that made her so recalcitrant this morning. The least he could do was let her wear her bloody skirt, sewn from the hands of her victims, on this, her last day.

Saturday, September 1, 2007

Project : Egg Shell Monsters

Project : Egg Shell Monsters
Date : Mid to end of September 2007
Materials : Egg shells, clay, solder, pins, copper tape, flux, hot glue
Tools : Soldering iron, hot glue gun, pliars, oven
Finished Product:


Process:
So you make some hard boiled eggs. Then you eat them. Best instructional steps ever, yes? Just be careful when you shell them- I used an exacto knife on one to pre-crack around the center. I found trying to salvage only one side of the shell per egg was best- the big endians working better. Let them sit for a day or two to dry and what not.

For the robo-egg, just lay down copper tape around the inside of the shell, prime with solder. Pre-bend the pins so that they poke out from the edge of the shell after a tight u-turn and attach. Then add the next segment of the leg. The end.

Hand-egg used twisted tinfoil as the base for the hands. Sculpt accordingly. I did not glue until after both were done. Be mindful of how the clay will contact the shell. Hot glue into place after legs are baked.

Thoughts :
The legs on robo-egg aren't insectil enough for my tastes. The angles at the joints are too wide, leaving it to sit too low to the ground. I've since picked up T-pins which I may use for another version later. The hand-egg was meant to be a leg-egg but I couldn't sculpt legs. This makes me sad. The hands aren't actually the same size, but it's okay because it looked like overly dramatized perspective. Feature, not a bug. Riiiight....

    Curios, she picked up the little creature as it scuttled past her yet again. With a delicate touch she pinched the shell and lifted it straight off the table, its tiny legs kicking frantically. She turned it upside down in an attempt to examine how the furiously moving legs attached to the shell. Look at it as she might, she felt her eyes unfocus or simply slide to one side or another.

    "Please put him down," the witch said as she returned to the room, carrying the tea tray.

    Sam felt guilty being caught prying and quickly did as the woman asked. Dropping the creature, she chipping the rim of it's shell with her haste. Unphased by the damage, the thing quickly scurried away around a corner as the witch came over and set the tray down.

Friday, August 3, 2007

Project : Steampunk Hair Piece v.2

Project : Steampunk Hair Piece v.2
Date : Aug 20th, 2007 one evening
Materials : Adjustable crescent wrench, wire, philips screwdriver (broken), streach red velvet, hot glue, solder, flux, thread, copper tape
Tools : soldering iron, needle, pliers, hot glue gun
Finished Product:

Process:

Images from v.1, now lost


Ridiculously simple. Cut/break/hack up the handle of the desired screw driver. Solder to end of of the wrench. On the first version, I had to saw off the end of the wrench (which ate up a new blade) and only hot glued. On second version, I cut nothing but had to lay down copper tape onto the wrench handle for the solder to take. Thing wire was twisted about and soldered to for extra stability. A thick layer of hot glue was added for stability but mainly to smooth out the uneven surfaces. Stretch fabric was then wrapped around and sewn into place. Make sure the stretch runs around the girth of the tool.

Version 2.0 is 6" long. The wrench half is 1.5" which is ideal. The center is 2" and does not taper smoothly on the screw driver side which makes it difficult to wear. This could be fixed if I were to cut the fabric off and reshape with more hot glue. The screw driver is 2.5" which is okay, but I could have done with a bit more length.

Thoughts :
These things are very easy to make and very pretty to wear. The screwdriver on the first came in handy several times and I suspect the adjustable wrench wont be neglected. The only complex bit is in fact how to properly twist your hair up to wear it. Perhaps I'll document that next. Version 1 had a better looking tool while Version 2 makes for a better hair piece.
The boys at work always carry around their Lethermans and other fancy tools in their belts or in boxes. Whipping out pliers with a crack or folding up a blade with a snap. I've decided to not be outdone and designed my own tool to be carried around at all times. It makes no loud sounds when brought into use, signaled instead by a cascade of hair falling down my back.
Elegant and functional, I find it to be a key item to display my thoughts on the idea of "steampunk"


UPDATE: While visiting Seattle, end of August, Logan sort of sat on it and the solder joint broke. I now have an excuse to go back and make it better, which I've not complaint to do.