Wednesday, September 10, 2008

Project : Chewie-kun

Project : Chewie-kun
Date : August-ish 2008
Materials : Brown fake fur, brown simple fabric, red satin-y fabric, two beads, thread, stuffing, 2 batteries, tinfoil
Tools : Sewing machine, scissors, needle
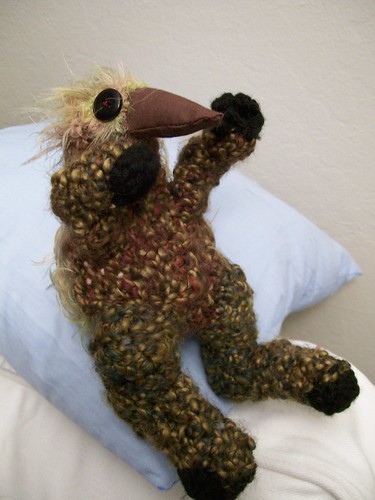
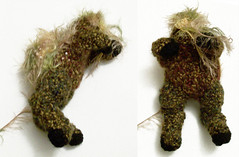
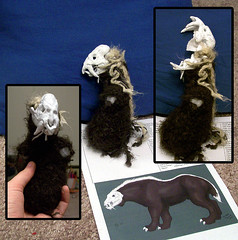
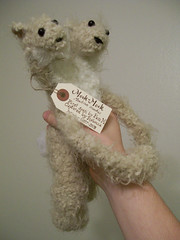
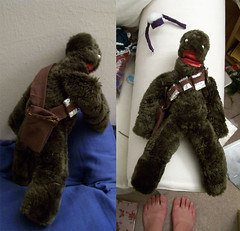
Finished Product:
ChewieKun_hangin ChewieKun

Process:
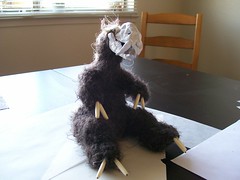
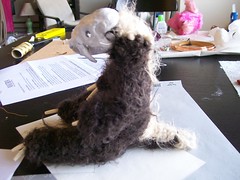
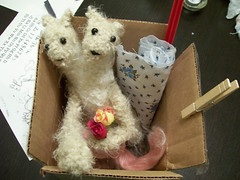
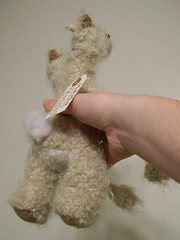
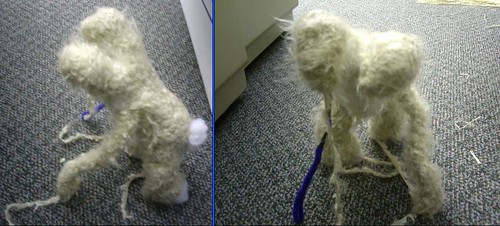
After sketching out an initial rough idea, which took the Chewbacca character and tried to make it as simple as possible, I just went at it with rough paper patterns and cut into the fabric. As I usually do when working with little fore-thought, I cut most pieces large and simply trimmed & tucked them down as I went to achieve the shapes. Made the torso first, then the head (lower jaw and upper skull being separately constructed pieces). Before connecting fuzzy head together, I sewed the inner mouth down with fancy red fabric. . The limbs were cut and made, bottom first. They have a slight flare as the limbs extend. Sewed a "kink" into the legs where the knees are. I wanted him to have more weight and hang better, so I stuffed the bottom of his feet with old batteries. I can't remember if I put them in the feet alone, or all four limbs. Used the basic brown fabric to make little circle caps at the end of the limbs. Added eyes. He didn't quite scream Chewbacca enough so I went and sewed a little sash, put a pouch at the end, and then folded tinfoil and sewed straps down for it. The end.

Thoughts : Gave it to my ex-co-worker and good friend Darren, who seemed to like it. That's good. The quality of craftsmanship was kinda' iffy... the fur hid my stitches while preventing me from making strong ones... The batteries in the feet added an adorable weight to it- making them swing back and forth just so- and seemed like a great use of dead batteries. I am holding onto all future dead batteries for such a purpose. Does anyone know if this can cause a problem somehow? The tinfoil "amo" was very tacky, but the belt was nice. Put a coin in the pouch, adding a nice weight. Given how quickly it was made, and how hard it is to mach Chewbacca fur specs from your average craft stash... it all turned out as a lame "okay".

He shuffled forward, long arms swinging back and forth and the fur around his feet rapidly accumulating a thick coating of dust bunnies. He could feel them dragging him down slowly, the Will of this space wishing him to stop and stay. The back of the couch towered above him, allowing only a thin sliver of living room light to tickle down. Ahead he could see the crumpled form half standing- propped up by wall and couch.

Something made a scuttling sound under the couch and Chewie-kun made a low moaning sound in fear. At the noise, Han Solo's stubby arm jerked and tried to wave. He wasn't as well stuffed as the fuzzier toy and the therefor was not able to right himself on his own. Han had only fallen behind the couch yesterday but already a heavy layer of cobwebs and dust had settled on him. A little fabric leg was bent and hidden entirely by the couch as if something had tried to pull him under.

With a growing roar, Chewie-kun shuffled faster for the last couple steps and charged full force- or as forceful as a toy can- into Han. There really was no better way to do it- when you've no hands but just fumble-y appendages, pushing and pulling in close quarters becomes hard. Both carried forward half a foot or so before landing in a pile. With his head lower, Chewie-kun could see something metallic glint in the dark under of the couch.

"WUUUURRrrrrrrr!" Chewie shouted, sweeping a limb back and forth to fend off the threat. Han had managed to squiggle over him and was limping and flopping toward the other end of the couch. Kicking and swinging his limbs, Chewie-kun continued, trying to follow. They *had* to get out now, or risk being trapped here forever- forgotten and molding!

Sunday, April 20, 2008

Squeaky Toy Monster

Project : Squeaky Toy Monster
Date : September 07 - October 07
Materials : Squeaky toy, yarn (2 types), buttons, fabric, thread, stuffing
Tools : Sewing machine, needle, crochet hook
Finished Product:
Squeaky... thing...


Process:
Ugly Squeaky

Take a squeaky toy- this one having been bought spur of the moment like at a checkout stand for $2. Crochet around it. In my case, mine was spherical and spiky. I noticed the spikes were sticking through the shaggier yarn so I switched half way through. Go back and start making a head. Switch halfway through to the limbs. In this case (and in general good practice) it's always good to do 1/2 to 3/4ths of the legs on all of them or at least a a pair on each before you finish them. I used a curve of black for hooves since I believe I was running out of yarn. After a long delay, I came back to it and not wanting to crochet more since it would muddy the look of the thing, I sewed a simple beak and attached it along with 2 (different sized) button eyes. Fin.

Thoughts :
Totally random project. I was visiting Seattle and came ill-prepared for the planned craft day. Grabbed the toy and yarn day of and did most of the base and some of the limbs in one sitting. I really like the curve of the hind legs and the hooves son all of them. The beak was the result of laziness but still looks good. It did take multiple sittings and there was a *massive* delay in the middle, but I'm still going to list it as "time: quick" since it was light speed compared to my normal crochet projects
Do not ask me what it is. It is made of yarn- do you know of any creatures made of yarn? No, I didn't think so. So why should it be confined to 'being' some creature of flesh and blood that you are already familiar with? It is like a gargoyl, made from an unliving substance, suggestive of many different creatures and yet very firmly of it's on kind. And like a gargole, it perches upon my castle walls and watches over me, protecting.

Of course, when I say "perches" I mean barely balances and my castle walls are rather short and defining a very personal eight by eight plot of office space. The only protection it offers notification of incoming attack with a loud squeak since my cube-mate, when arriving or leaving, can not seem to avoid squeezing it and, if I'm unlucky, chucking it blindly at me over the wall.

Wednesday, March 12, 2008

Project : Skull Bear

Project : Skull Bear
Date : January 2008
Materials : Wire, tin foil, clay, white out, hot-glue, a pinch of fabric, yarn (2 types), thread, beads (temporarily)
Tools : Crochet hook, needle, hot glue gun, oven
Finished Product:
Skull Bear FinalSkull Bear Final


Process:
Skull Bear : rough finishSkull MonsterSkull Bear : rough finish

Given that I'm a poor sculptor, I started with the head. Looking back, I would have started with the body- as I do with almost all my projects- and *then* done the head. Sigh. Live and learn. Anyway, I bent some wire and used some tinfoil and then some clay and BAM, I made a skull. Of course I was desperately looking at photos while I did this and it still sucked. There's a skull top and seperate jaw, mind you. Baked them, then painted 'em with white-out. Started crocheting the bear. Had massive, massive, *massive* problems sculpting it correctly. Left a gap at the bottom and also inserted a wire spine. Got glued a scrap of fabric to the clay bits and then sewed that to the yarn. Had difficulties sewing it such that the two would line up. Then I crocheted the limbs. Put very stupid looking beads on as claws, closed up the rump and called it good. Went away for a while, then came back to it. Sculpted clay claws and then went over the chest with some re-shaping crochet and added an (ugly) tail. During this all one of the teeth broke off but was easily hot glued back on and then repainted with whiteout. Several paint touch-ups were needed throughout but luckily whiteout is easy to find, use, and dries fast (the reasons I picked it)

Thoughts :
Good first try. Interesting idea I will have to try again. Skulls are a bitch though- hard to draw, hard to sculpt. Toy was made upon request for Moonykins for the Ohantra character. You can see I was less successful adapting this one- moved it from an on-all-fours character to a more doll-like form. Also the shaping around the jawline failed despite my best efforts. Really, I blame working head-first for most these problems. It's actually really fun to play with. I like making the mouth open and close to sing along with whatever I'm listening to. The sculpted claws are also quite awesome- the hands are individual claws while the toes are fixed in a row.

Project : Furry Doll

Project : Furry Doll
Date : Feburary 2008-March 2008
Materials : Fabric (white, pink, orange, green), pink wool, yarn, thread, stuffing, embroidery floss (green, black, pink), rice?
Tools : sewing machine, needle, scissors
Finished Product:
Furry Toy

Process:

Shockingly simple once the basic form of the head was settled on. Unfortunately I shipped the toy of months ago and cannot remember/figure out from photos how the head was shaped... I think there was a connection between head and neck, but maybe not? You can tell there is a clear connection between neck and body. Head and body were connected, then the legs made, compared, and then connected. Next the arms were made, compared, and connected. In both cases an incorrect limb was made that was discarded. Filled with rice (I think?) to achieve a heavier feeling. Very basic. The hair was small chunks of wool pulled through the fabric. The eyes, eyebrows, and mouth were embroidered on while the nose was an actual scrap of fabric. The headband and tank-top straps were yarn. The cloths were extremely basic in design- basically just tubes and the straps are only tucked into the shirt, not sewn.

Thoughts :
So much disdain for this project! Ick! It was an interesting practice on matching a photo and doing something I didn't find interesting. The character was made for the real-media-exchange and then mailed off. It was based off this character. I know a lot of what I would call furry artists on the net and a couple mild "furries" but the more hardcore furries freak me out.

Despite my loathing of it, I *do* think it turned out really well. There just some poor puckering around the snout but other then that it's a good match. It's important to note how much better the doll looks with the cloths- a major improvement for minor work. The hair was sooooo much fun to do! I'm excited to try it again. The fabric was of poor quality and it took quite a beating pulling those chunks of wool through it, but it survived and playing with the hair is by far the best part of the doll.

"Glowsheep : Most cursed project ever?
I should honestly just mail this off ASAP before my house burns down or something.

Started off by losing the needles I was using/needed for it.
Spent half an evening searching for my white thread.
Then I lost the vibrant orange fabric for the pants.
Then I lost the right thread for the blouse top.
Then I lost my CAMERA to take pictures of it."
-- excerpt from my post saying I'd finished the project. I lost something else as well, but can't remember it at the moment

Project : Mook-Mook

Project : Mook-Mook
Date : February 2008
Materials : Yarn (2 colors), wire, stuffing, embroidery floss (black), fabric, thread, beads
Tools : crochet hook, needle, sissors
Finished Product:
Mook-Mook1Mook-Mook3Mook-Mook2


Process:
MookMook : Early Stage

With the crochet monsters there is both a technique and a wild attack that goes beyond words. Some day, I'll write up the technique...
I started at the throat and crocheted down. Giving a monster a "tummy" may make it look better, but switching back and forth between the yarns as you makes for a less fluid flow. The mid-section has only a minor bulge relative to the thickness of the neck. Went from the neck and crocheted up one throat, then back to the neck and up a throat and most of a head. I switched back to the first head, finished that, and then finished the second head. Then the hind legs were added, the bottoms staying open. A two pieces of pipe-cleaner were stuck through the body and then crocheted (tightly) over on both sides to create the front arms. Little circles of fabric were cut and then sewn to the bottom of the feet. Some stuffing was affixed to the rump- I can't remember if it was pulled through with a hook or needle or flat out needle felted on. The ears were added- nubs of crochet with a tiny triangle of fabric sewn on the back. Eyes were added and then little triangle noses sewn on with floss. Somewhere in there I went back and crocheted over the chest a bit to correct the shaping.

Thoughts :
I don't know where the name Mook-mook came from, but it struck me day one and stuck. He was created for a Ravelry craft exchange based on someone else's sketch and I'm very, very sorry to see him go. I'm fond of the girl he went to though and I got a *fantastic* creature in return so I don't regret doing so... but still there's sadness. This is the first of my monsters that both the Greatest Living Philosopher and I like.
Despite looking so cute at the end, he went through some rough times. At a Dr. Sketchy's session, the lady next to me said it looked like a penis wishbone mid-way through. And when I was picking up eyes, my friend claimed to be highly skeptical of how it would look... although seeing the final product I know that the eyes are the key to the "cute" look. Relatively easy to make... the rabbit tail idea was random and I should do pipe-cleaner arms like that more often. Last thing to note is the tag. I saw many tags like this at the Swedish Natural History museum, hanging from the legs of long dead creatures, some times typed, sometimes handwritten. I feel they bring a sort of credible, sophisticated look to the creatures that I strive for. This one was lovingly made and I feel really adds to the look. (The tag was nabbed from work... I NEED to find where it comes from so I can buy handfuls of them)
The tag reads:
    Mook-Mook
   Mookion mookus (in italics)
   First seen by Pam M
   Caputred by Rebecca
   Winter 2007-2008 (in italics)