Reasoning: This is a work-in-progress post. Inspired by a Ravelry msg board discussion.
Rough Draft :
1. The Body

A good monster leans on the kidney shape with all its might. At least for the look I aim for. Spheres and cones can get you somewhere, sure, but not where I'm going. It's the kidney. So organic! So in flux! So versatile! One of my cardinal rules when worken' it is to never have a static shape. Tubes are death. Death tubes. Of yarn. This becomes far more difficult when working on limbs, but that's a problem for another day. At least with the torso, tubes are pretty easy to avoid. Cones are just kidneys you don't round out and bend sharply enough.

Why kidney? Because kidney can be anything! And you should approach the project open to anything. Starting a crochet monster is like starting a relationship. Don't go in with too many strong expectations. You can have some basic ground rules- color, size, texture, mood- but anything more will be stifling. Especially for the first, say 5 or so. Be open. Be flexible. If you don't have a specific shape, you can't fail. And that is why the kidney is awesome. Say you start off hoping for an 4 limbed monster with a slightly hunched back. Camel like, lets say. But oops! You curved too sharply and tapered the rump/main bump off too slowly. Well now you just turn that on end, and you've got an upright with a hunched back-- maybe the head built in already. It's all good.
Okay, sure, lets say we all love kidney's now. How to make them? I use (on the torso at least) only 3 things- increase, decrease, and double back. I don't know how common it is, but when I'm crocheting I chug along one way, hook in hand X. Well, if I want to induce a turn, I just toss my hook in to the opposite and and start pilling stitches on in the other direction, back-tracking. This doubling back- first spanning a large area and then shortening the span as you add more rows- is the easiest way to get a gradual curve. This also helps with the flaring that you find in a kidney bean shape.
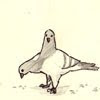
The key to working with a changing shape is to always be aware of your 'future tube' projection. Look at the "rim" of your crochet. Imagine what would happen if you added twenty rows without any increases or decreases or double-backs. Here I'm going to reference my icky-ugly image. We are looking at a kidney shape from slightly 'behind and above'. You might think I'd say 'we started working from the tiny end down' but I must state that I usually start a little ways down from the actual 'tiny end' end. I start 25% of the way 'down', work towards the big end. Then clip it, do the tiny end, then go back and close off the tiny little gap I left remaining on the big end. Helps with stuffing & weights. But anyway! I digress... shaping....

In this image. We see Figure A. Imagine that we started crocheting right there on that left most red band. Well, if we look at Figure B. you can see the green 'future tube' that path will take us. Ick! We have to aim the tube downwards. And so I do some double backs. Back in Figure A. the red lines mean I'm crocheting <--- and the green lines mean I'm crocheting ---->. After I've done that you can see my 'future tube' in Figure B. Hmmm... Now I'm angled too far down! And kind of too thick. Well, don't freak out. I have to continue out to the vague purple dotted line there before I've reached my max girth, then I can start rapidly dwindling. How does the 'future tube' help me know that? Well... I can't quite put my finger on it, but it does....
Note that when I'm going from Figure C. as is to the purple dotted line, doubling back alone isn't going to cut it. I'm increasing my area and that means increases in my stitching. Note that the length of the dotted purple line is far larger then the length of the current edge (measured from where it intersects the dotted line). This, plus the fact that I'm not actually curving that rapidly, is what tells me double-backs and increases are what I want.
I can't stress enough how to think about each stitch taking a uniform space. Now I'm going to violate this rule in future posts, but for the most part, pretend that every stitch is the same size. One stitch = one stitch blob. If you increase, when you get back to that spot on the next row you will have two blobs where you earlier had one. When you decrease, right then and there you are squishing two blobs into one. When you double-back be mindful that there your perimeter grows and therefor more blobs are being added to the rim over time slowly. Stitches are blobs and blobs want to be evenly distributed. So if you increase at evenly spaced out intervals, your shape will gradually expand. If you increase rapidly in one location, or at the same spot every time around the row, you'll get a cancer blob. Which isn't always a bad thing. Stitch blobs can only take up X amount of space each (no stretching) and they only WANT to take up X amount of space (no crowding).

If you can make it through all that text above, I applaud you. Makes my eyes cross a bit just reading it. A couple final notes about the torso-
- don't add wire-frame (if you're going to add it) until after you finish the torso. If you need a spine running through the torso, wait till as long as possible to avoid adding it. I'll talk more about this later
- Stuff as you go (even if it can potentially fall out the other end). Seeing the shape evolve in it's inflated form really helps!
- I only work with 'fuzzy' yarn. This is because if you work with non-fuzzy, sock-like yarn you can see the actual stitches clearly and they don't look that nice. This is tooootally opposite the whole arigumi style. I aim for slightly furry (but not Fun Fur level) yarns. If your yarn isn't fuzzy (enough), AFTER you finish the project, you can take a cat brush to it and make it fuzzy. Damnit.
- Multi-color bodies are hard. First do torsos all in one yarn. The, eventually put a split somewhere- the rump or neck is a different color. Then, eventually, a tummy or stripes is possible, but switching between yarns makes shaping hard. I'm just finishing something with spots. That was *really* hard (and the spots didn't turn out all that well)
- If it wasn't clear from this topic- start with the torso. Head, limbs, etc comes later. Just torso to start with! Just torso!
Next Topic : Limbs
(Eventual Topics : Head, Extra Body Parts, Non-Yarn Items)
4 comments:
Welcome to sketchyscribbles...nice work!
Ben C.
You have really great taste on catch article titles, even when you are not interested in this topic you push to read it
Thank you so much for this. I'm new to amigurumi and, wanting to attack the weirder critters head on, found that curves of a non-spherical nature were difficult to do. Your article provides me with the logical steps, as well as giving me permission to work outside the box, against the grain, and patternless. It's hard, when new, to cut those strings attached to every book and pattern out there, but seeing the creations out there I knew I'd want to do more than stack to spheres, add legs and ears and call it whatever it seems to be colored like. Thank you for your insipration.
I would appreciate more visual materials, to make your blog more attractive, but your writing style really compensates it. But there is always place for improvement
Post a Comment